
Taxis in Korea are your go-to saviors, especially when you’re running late for a meeting or just in a hurry to get somewhere. They’re like your speedy magic carpets, ready to whisk you away from wherever you are to your destination in no time. And when it comes to these convenient rides, Kakao Taxi (or Kakao T) is the Korean superstar in town, sort of like Uber but with a bit of extra Korean flair. In this complete guide, we’re diving into the nitty-gritty of how to make the most of Kakao Taxi to make your Korean travels way smoother and way more fun.
Introducing Kakao Taxi:
Kakao Taxi is a ride-hailing service that has revolutionized transportation in South Korea. Developed by Kakao Corporation, the creators of the popular messaging app KakaoTalk, Kakao Taxi connects passengers with licensed taxi drivers through a user-friendly mobile application. With its user-centric features, real-time tracking, and seamless payment options, Kakao Taxi has become an indispensable tool for both locals and tourists looking for a convenient and reliable way to get around.
Requirements for Using Kakao Taxi:
To use Kakao Taxi, you’ll need to have an active Kakao account. This means having the KakaoTalk app installed on your device and being logged in to your Kakao account before using Kakao Taxi. If you don’t have a Kakao account yet, don’t worry – we’ll guide you through the straightforward process of creating one, as outlined below!
Creating a Kakao Account:
To create a Kakao account, the first thing you’ll need is a phone number. It doesn’t have to be a Korean phone number; it can be your number from your home country. However, it’s essential that this number can receive text messages to activate your new Kakao account. Follow the simple steps below to set up your Kakao account:
- Install KakaoTalk App: Start by installing the KakaoTalk app, which is used to create a Kakao account. Once the app is installed, open it, and select ‘sign up’ to initiate the account creation process. You can find KakaoTalk on both Android and Apple devices.
- Enter Your Email: Provide your email address, personal details, agree to the terms, and then continue. Your Kakao account will be linked to this email address and used for logging in. Note that this email address cannot be changed later.
- Phone Number Verification: To create your Kakao account, you must enter a phone number. It doesn’t have to be a Korean phone number. Choose your country’s dialing code and then input your phone number. You’ll receive a 4-digit security code to confirm that you own the phone. Once you get the confirmation code, enter it to proceed with setting up your account. Please keep in mind that if you use a foreign number, the approval process may take a few days, while Korean phone numbers typically activate within a minute or two.
- Password Creation: After you’ve received the security code and your phone number is verified, complete the account setup by choosing a password. Make sure to use a combination of lowercase letters, capital letters, numbers, and a special symbol for security.
- Personal Information: Lastly, provide some personal information, including your date of birth, gender, nickname, and an avatar. Some of these details are optional and not mandatory.
If you already have a Kakao account, you can easily log in to Kakao Taxi as long as your Kakao account status is set to “logged in.” Then, follow the steps outlined below to book a taxi using Kakao Taxi.
Getting Started with Kakao Taxi:
1. Download the App:
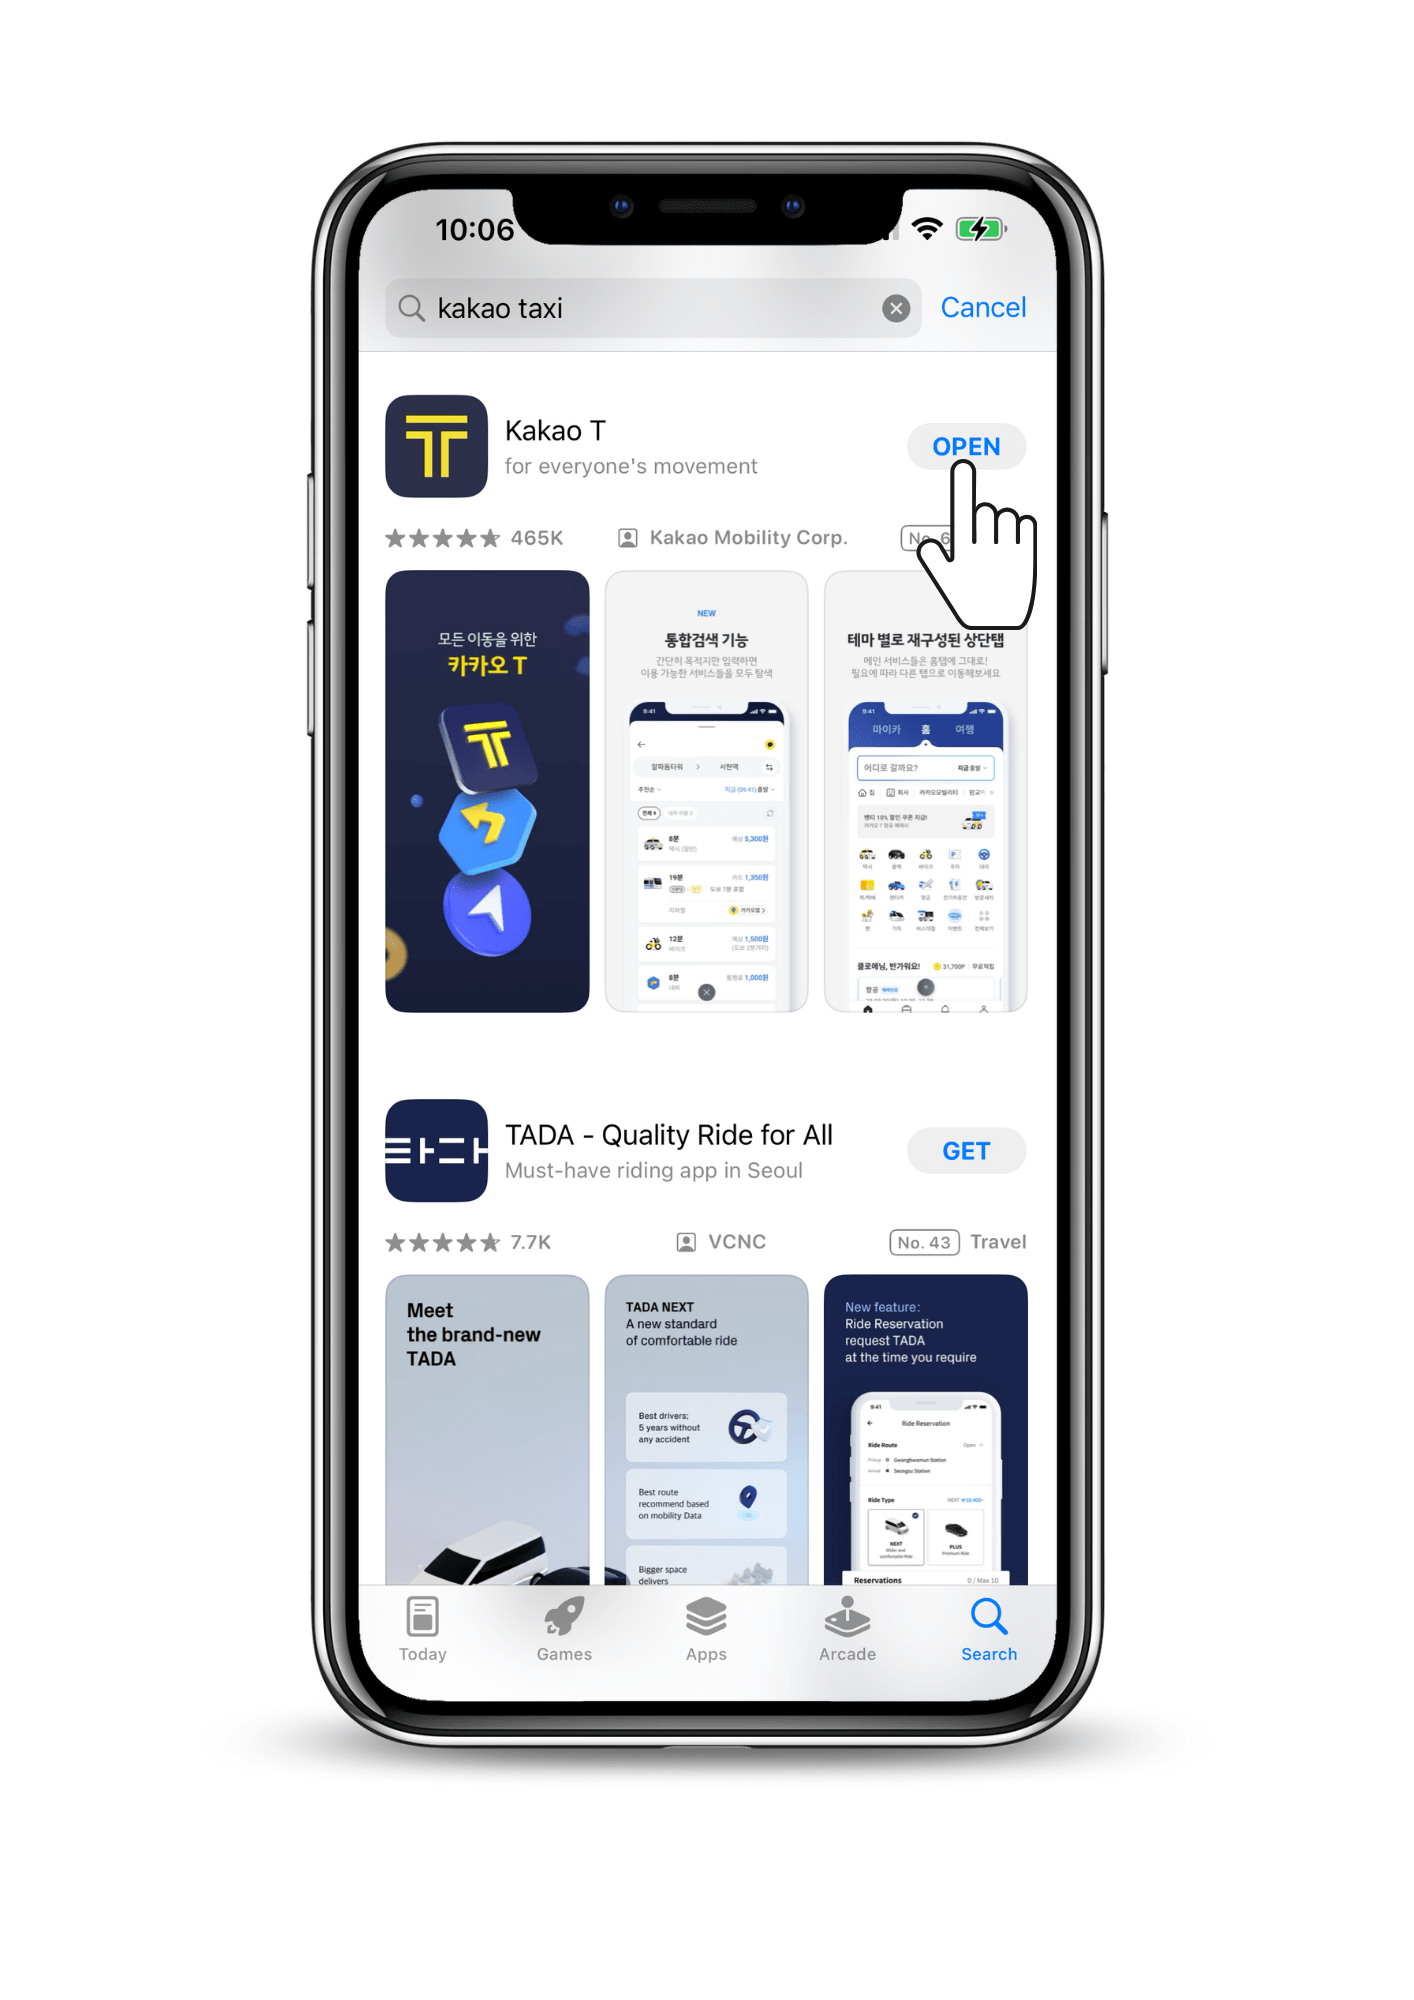
Before you kick off your Korean adventure, ensure you’ve downloaded the Kakao Taxi app, available on both the Google Play Store and Apple App Store. Notably, the app is user-friendly, even for international travelers, as it offers an English-language option.
2. Setting Up:
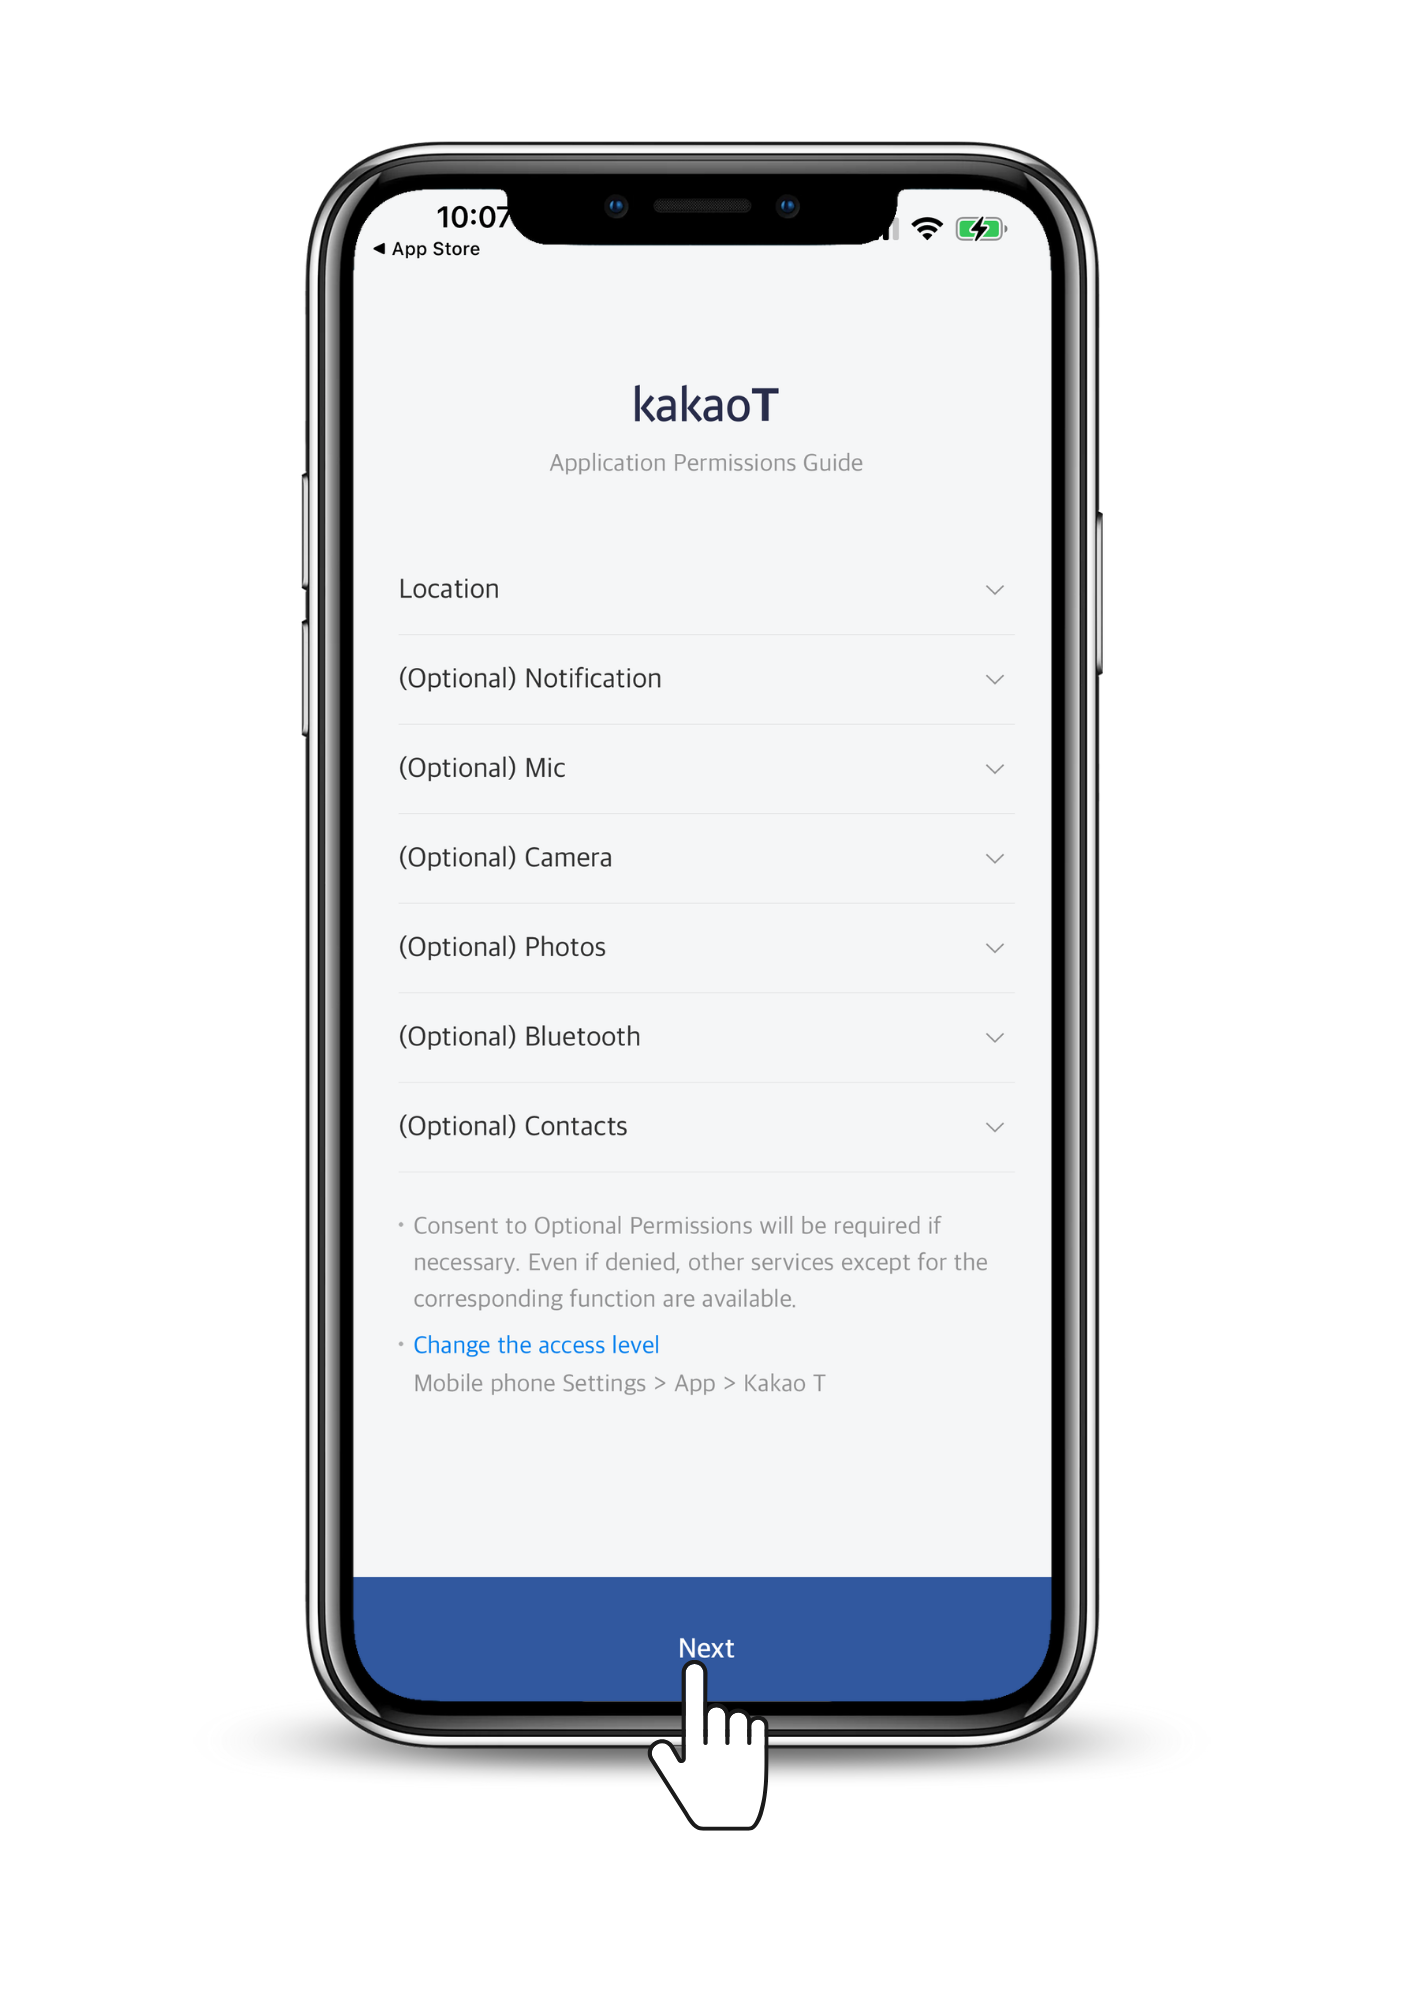
Once you’ve successfully downloaded the app, open it, and you’ll encounter an application permissions guide. Simply tap ‘Next’ to proceed. Then, select ‘Log in to Kakao Account.’
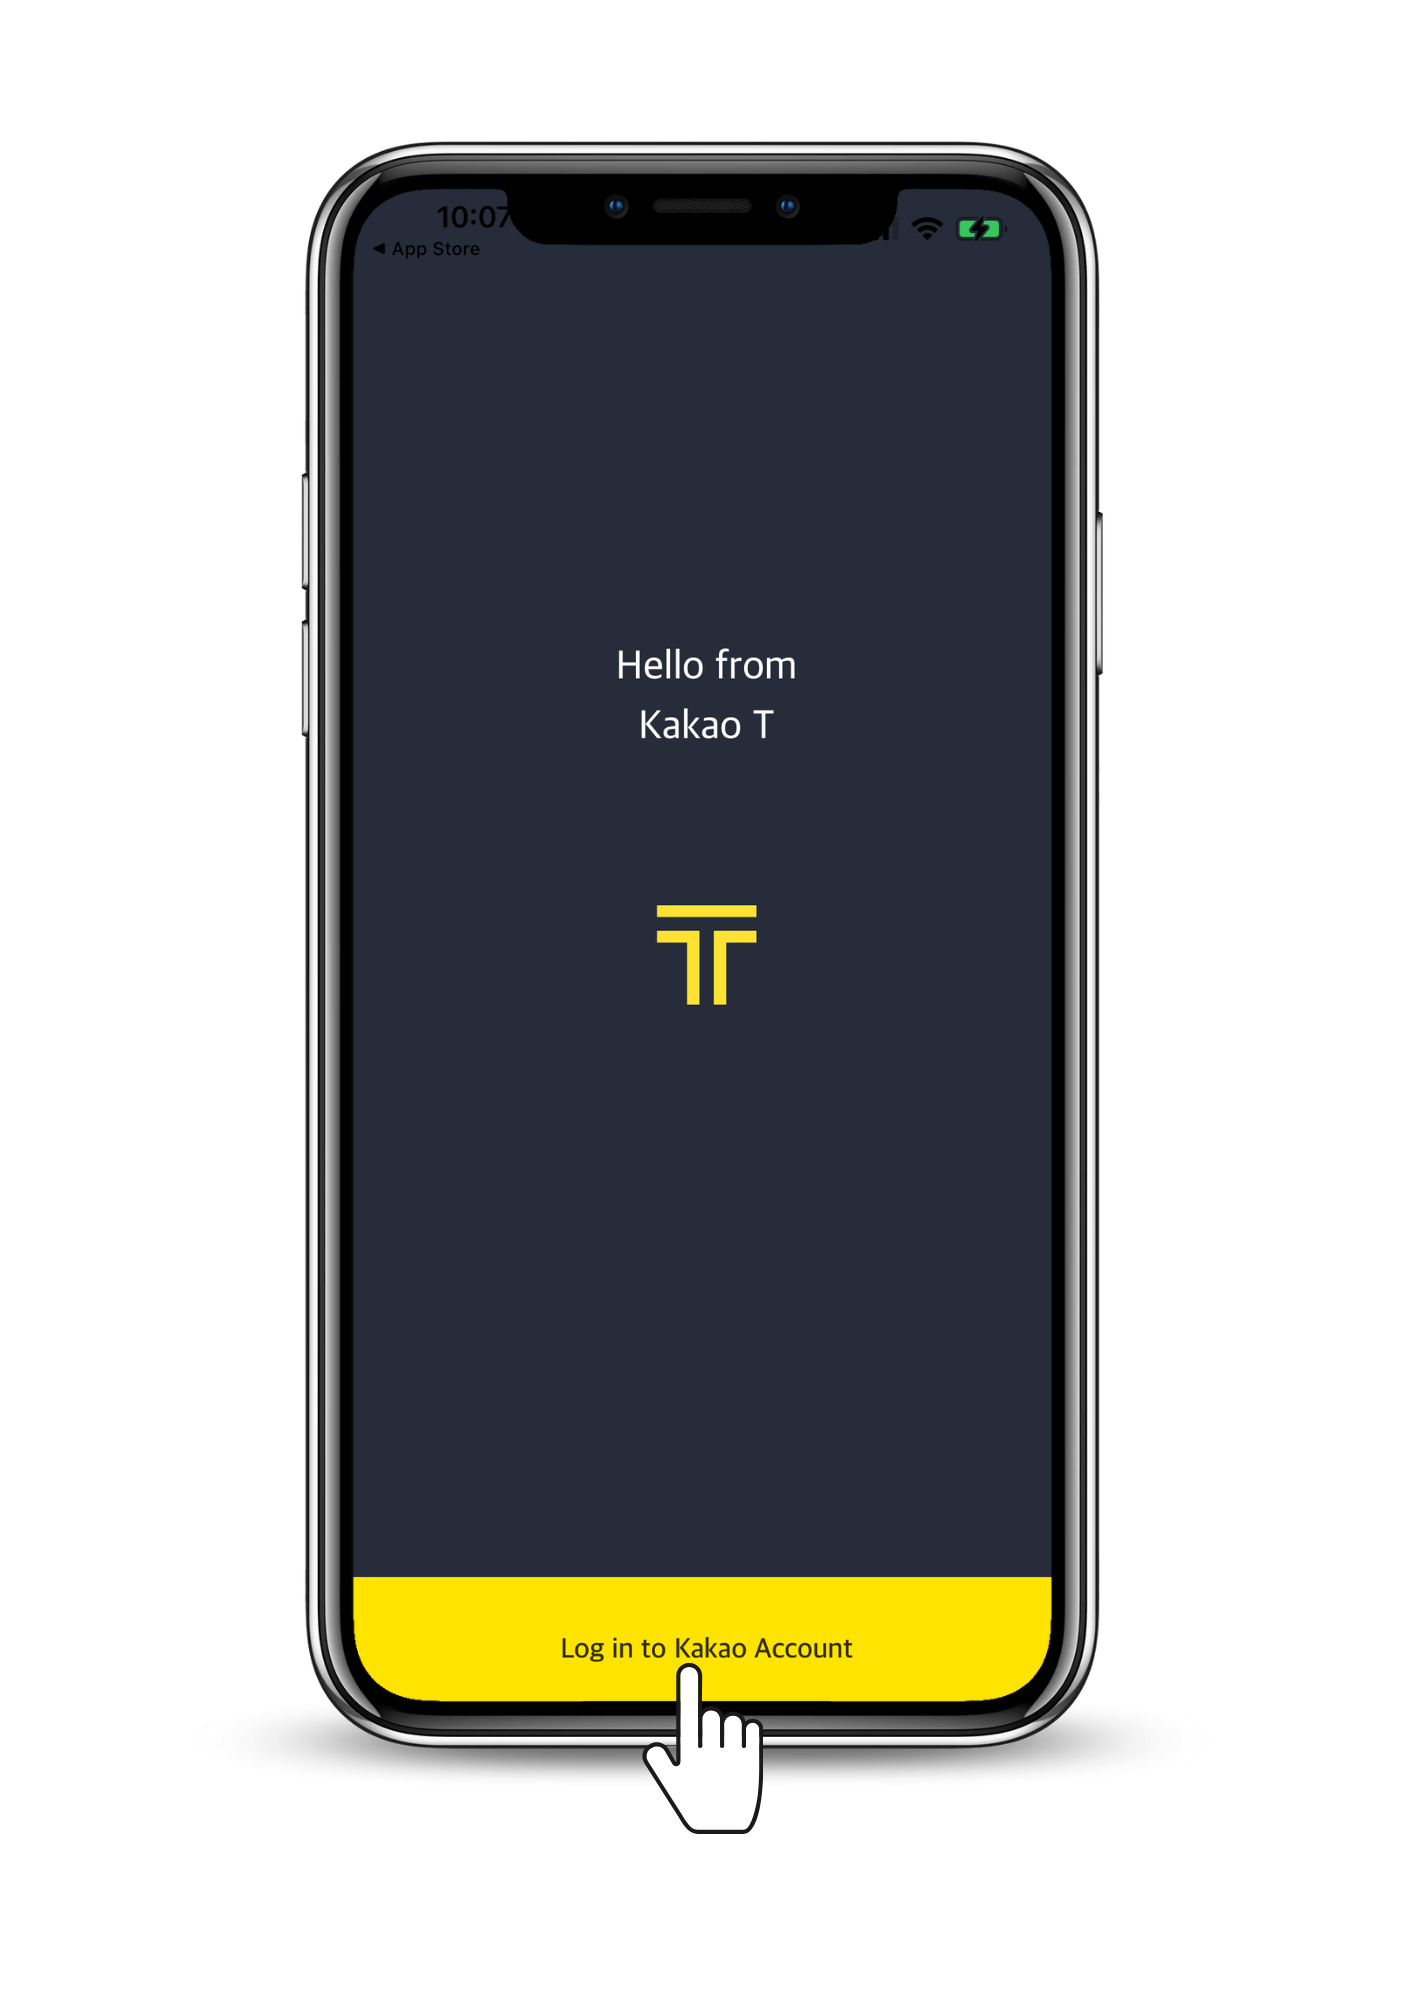
If you’ve previously logged in to your Kakao account via KakaoTalk, you should successfully pass to the next page and receive a pop-up asking for permission to allow Kakao T to track your activity. You can choose to allow or decline this. In case you’re not already logged in, the app will prompt you to ensure you’re signed in to your Kakao account.
3. Language Settings:
Upon successful login with your Kakao account, the app will typically adapt to the language settings of your mobile device. If your phone operates in English, Kakao Taxi should naturally display in English. However, if you find that Kakao Taxi is set to Korean and wish to switch it to English, here’s a quick and easy way to do so:
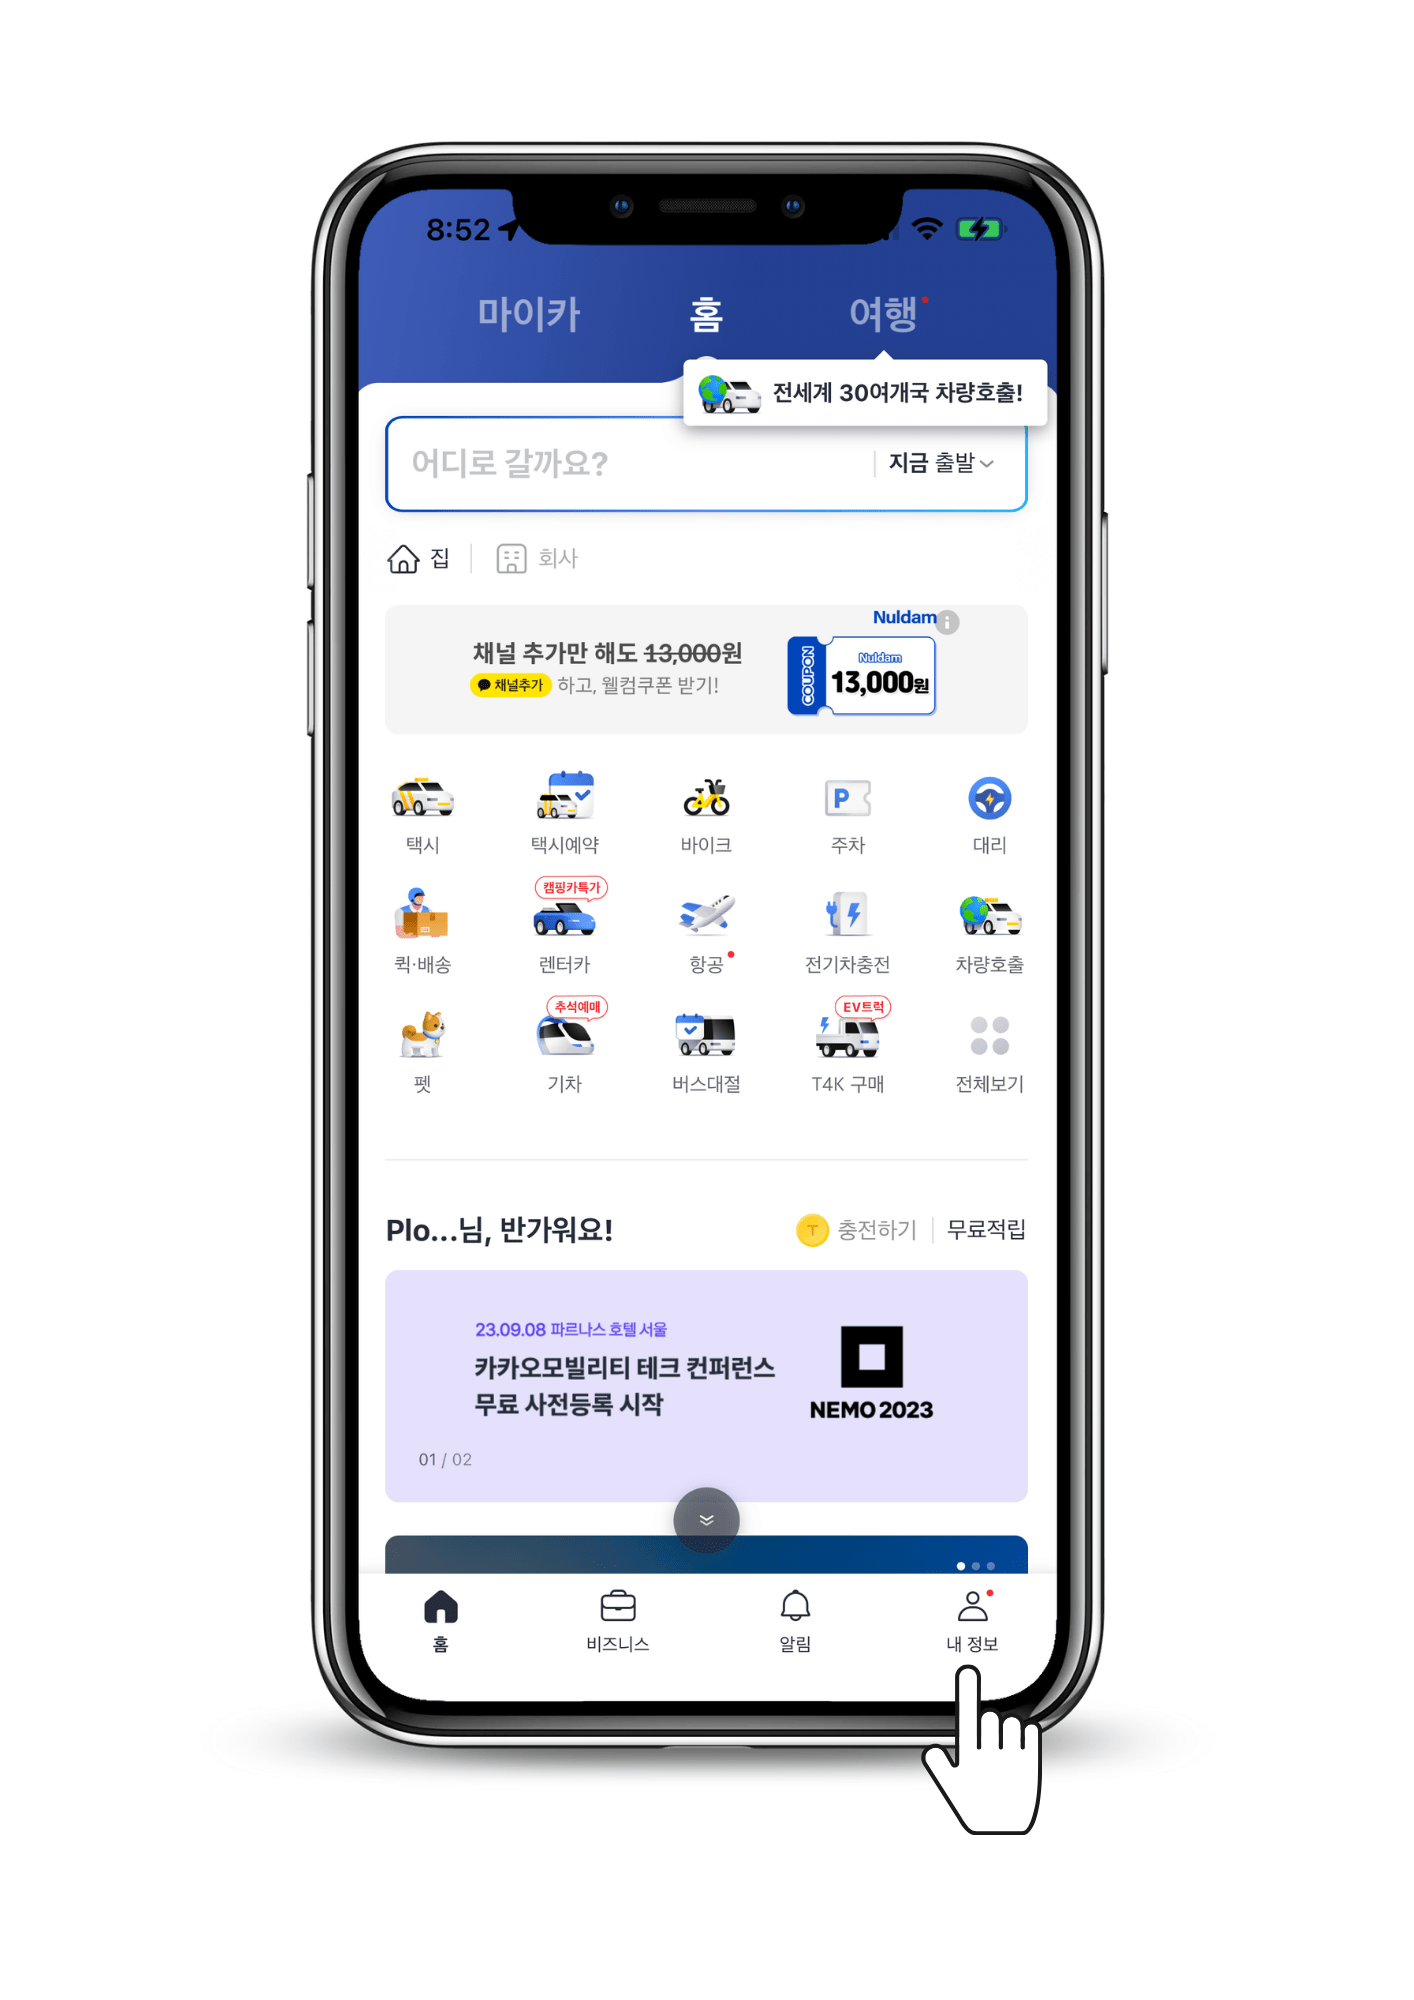
- Locate the profile settings tab, symbolized by ‘내 정보’ (meaning ‘my info’), positioned at the bottom right of the screen. This icon resembles a person and houses all your account settings.
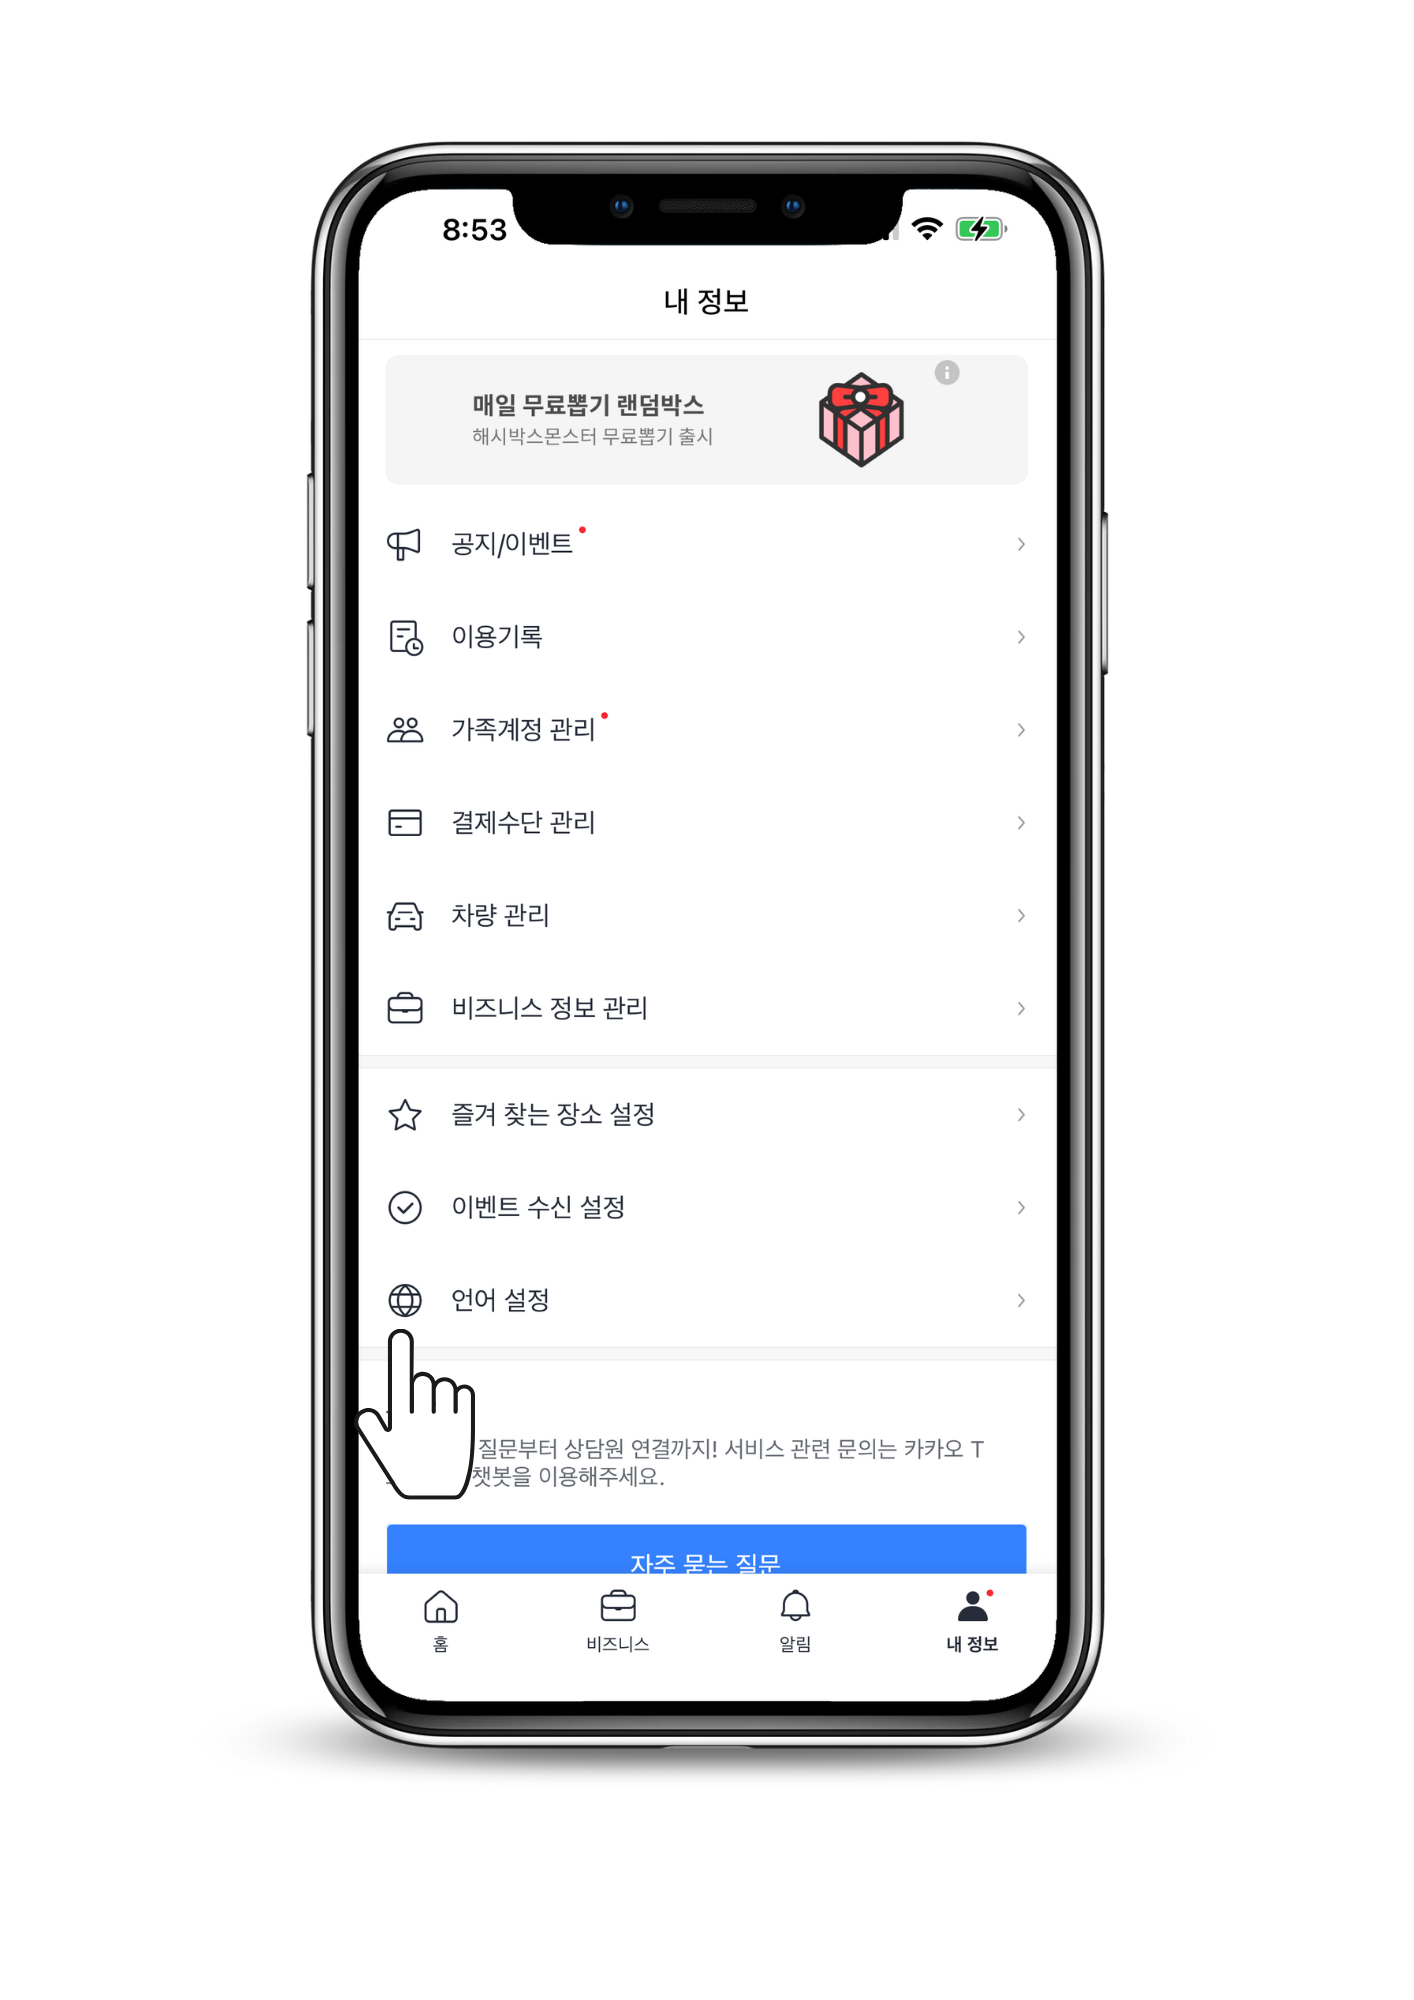
- Scroll down the page until you spot a globe-shaped icon. In Korean, this label reads ‘언어 설정’ (Language Settings). Tap on this option.
- You’ll now encounter four language options. The first option mirrors your phone’s language setting (provided it’s one of the three supported languages). The second option is Korean, the third is English, and the final choice is Japanese.
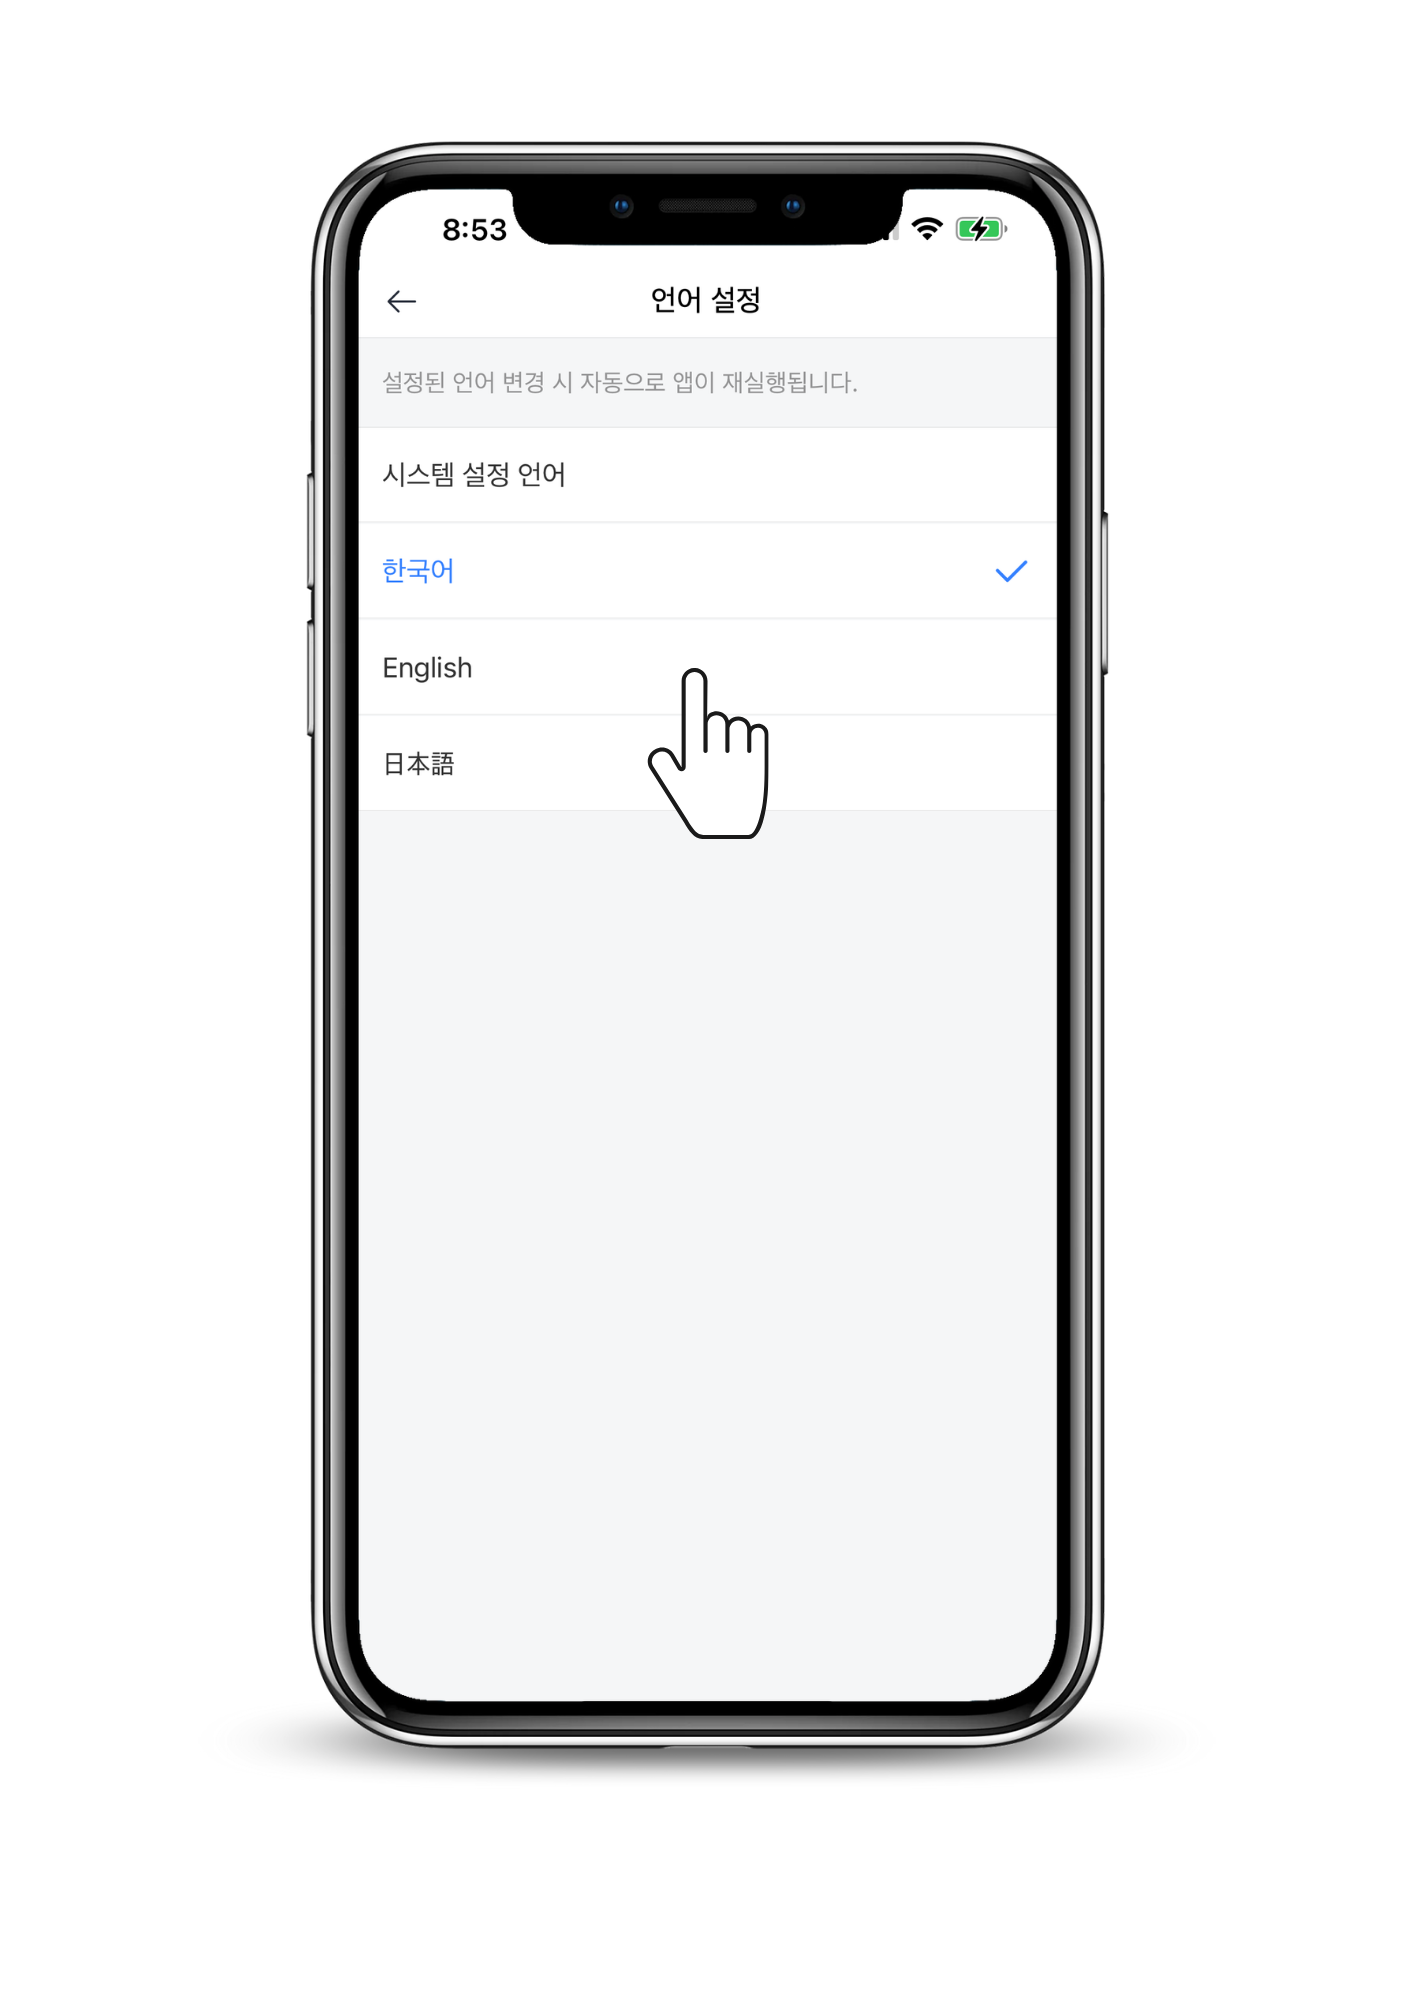
- Select your preferred language, and after a brief app refresh, Kakao Taxi will switch to your chosen language, ensuring a seamless and comfortable experience.
Booking Your Ride:
Now that you’re all geared up for an exciting journey, let’s delve into the process of booking a ride using the Kakao Taxi app.
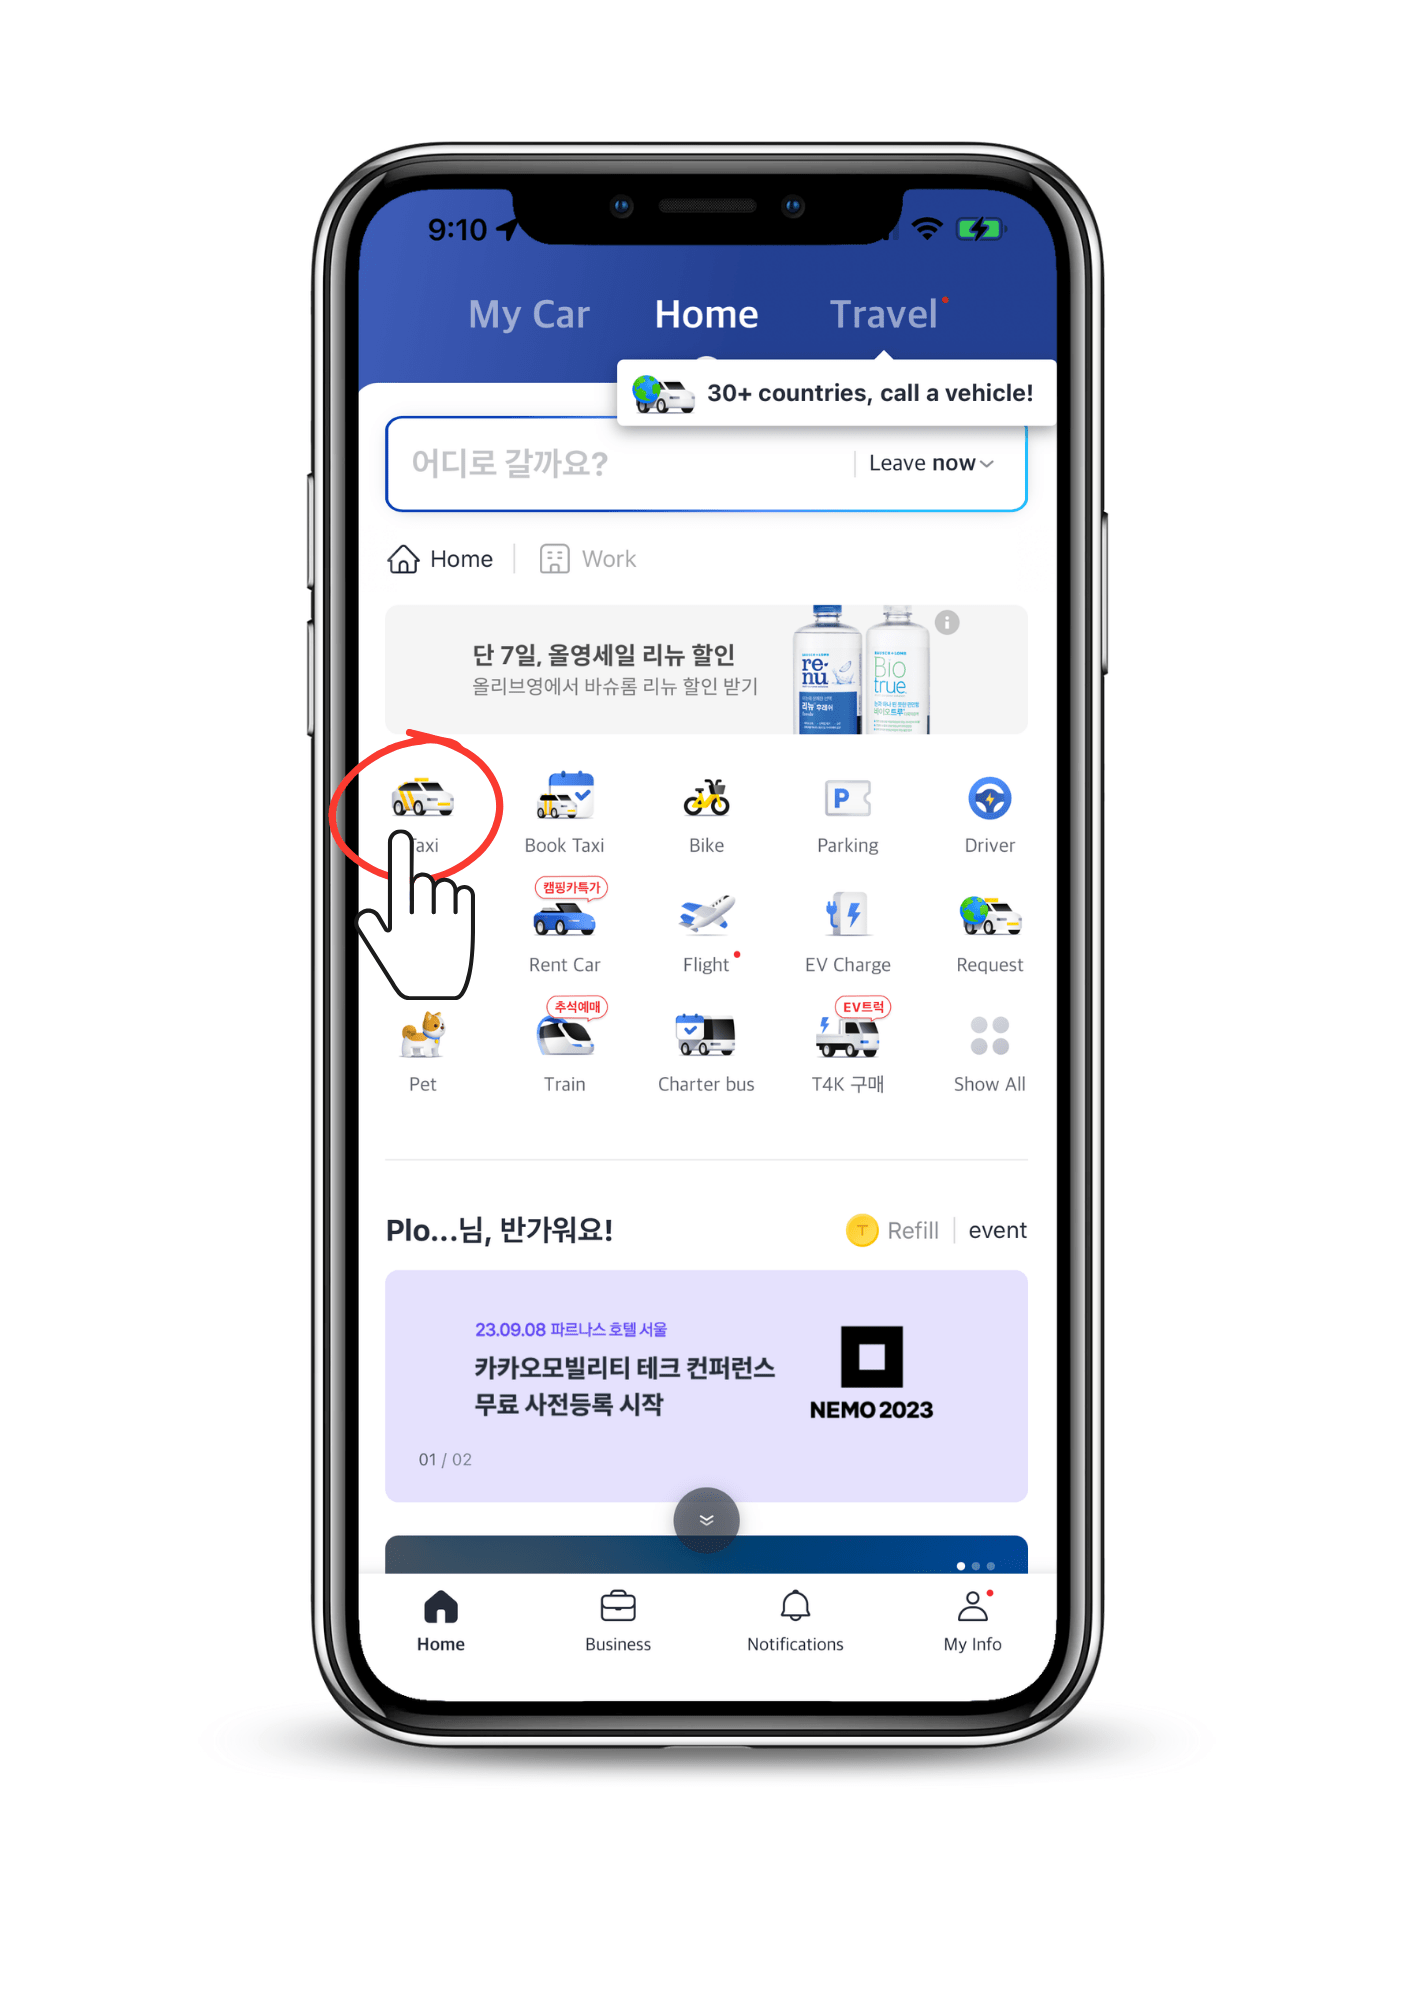
Step 1: Select Taxi Booking
Begin by clicking on the taxi symbol situated at the top left corner of the Home page. This symbol is the first option you’ll see on the screen, and it will seamlessly transition you to the taxi booking section.
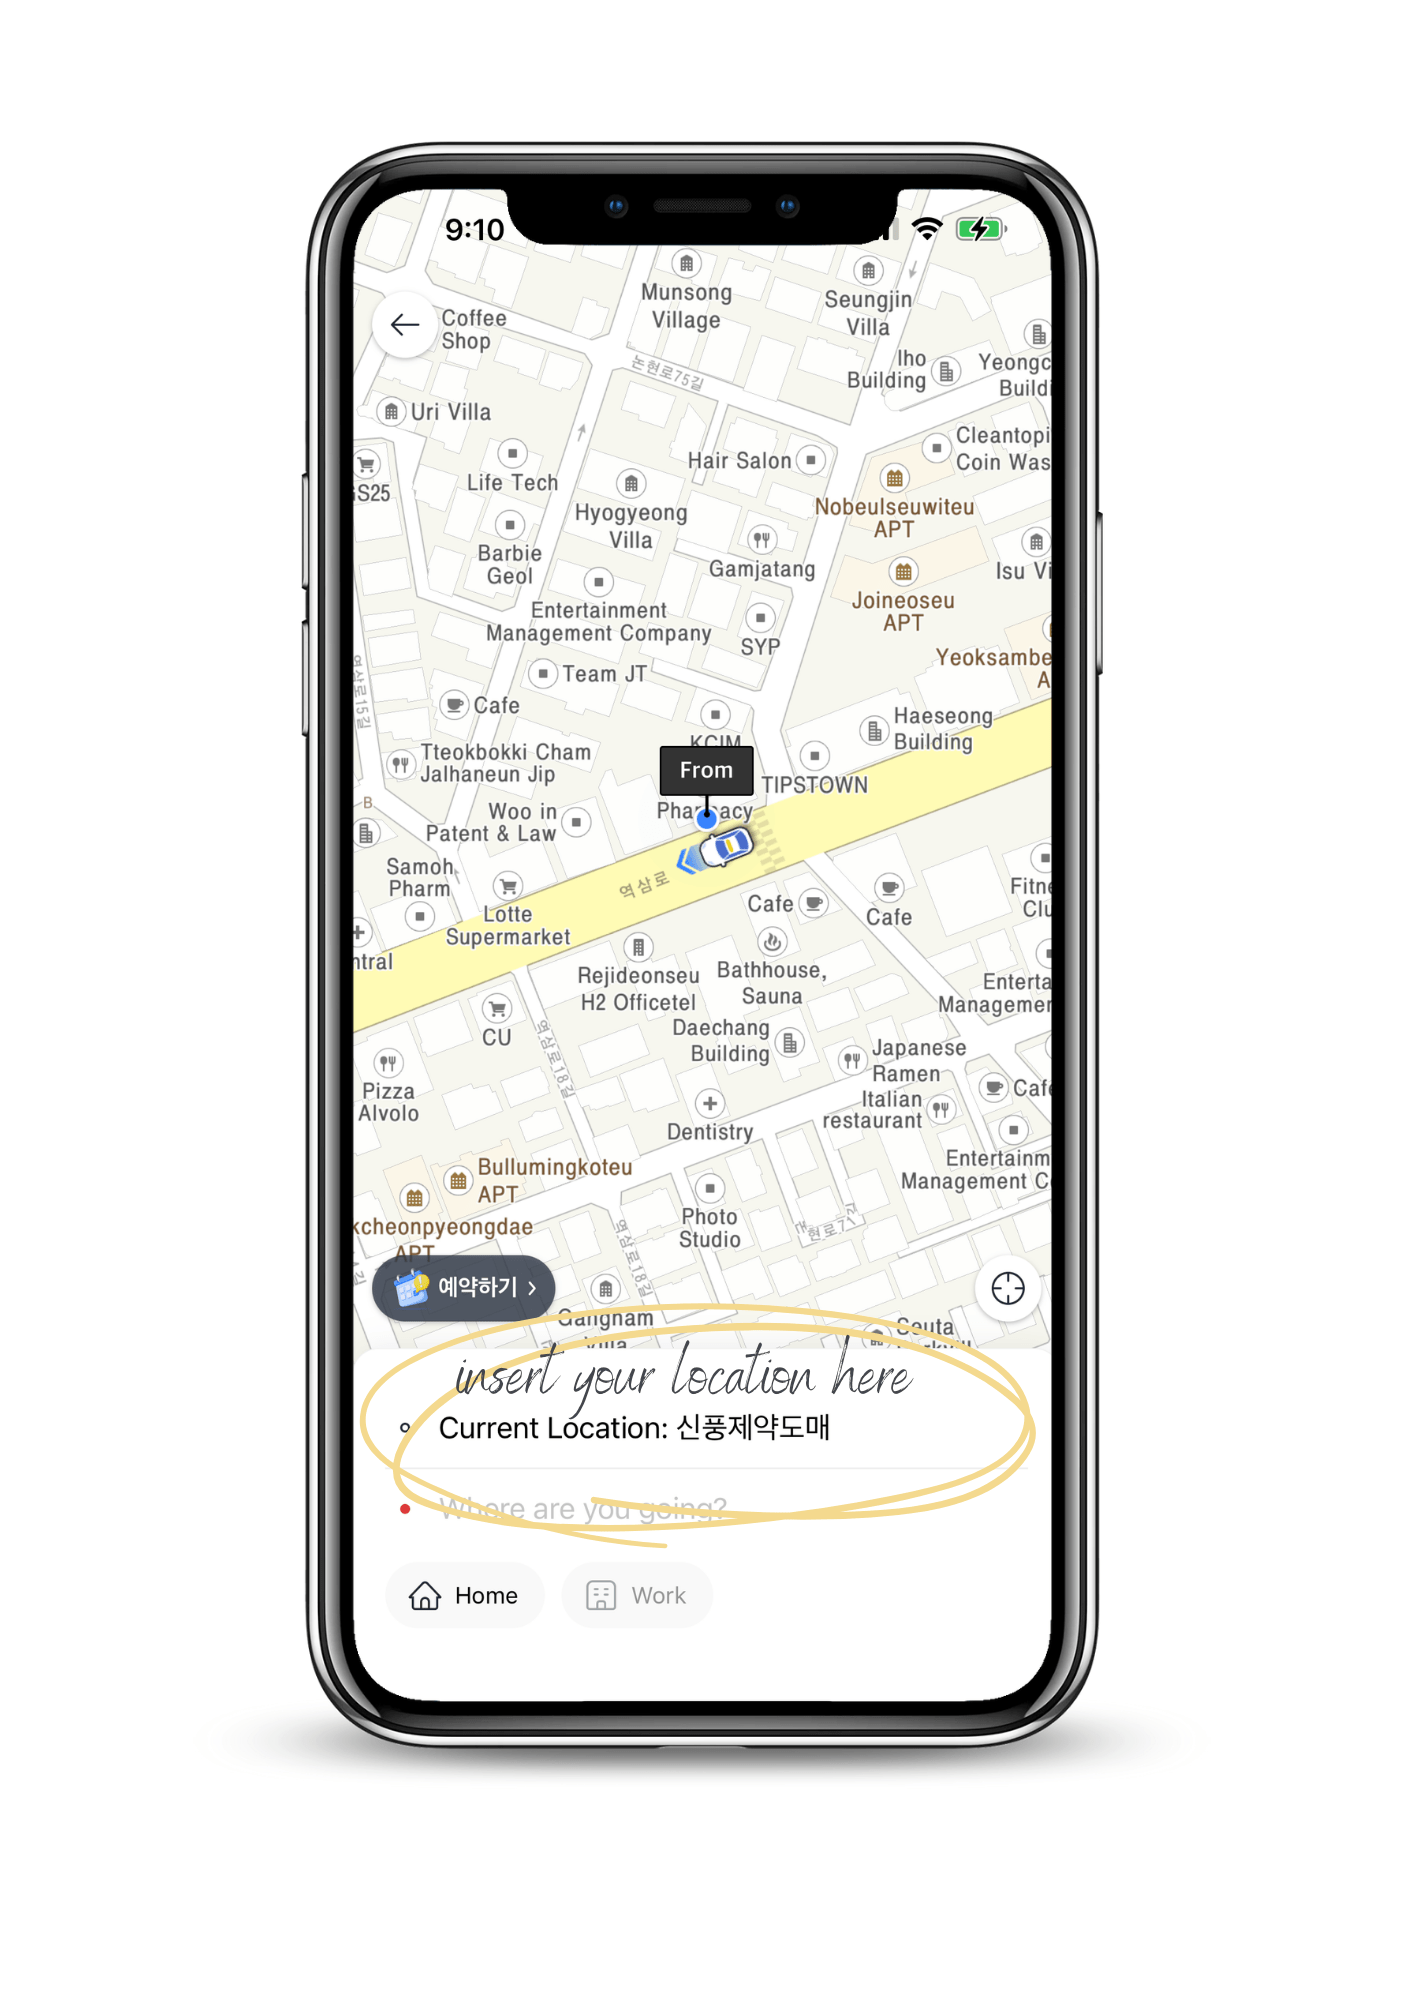
Step 2: Choose Your Starting Point
Your starting point will automatically default to your current location if you’ve allowed location tracking. If you wish to modify the starting point, simply enter the name or address of your desired location. Alternatively, you can adjust the pin symbol on the map by dragging your finger until it aligns with your chosen starting point.
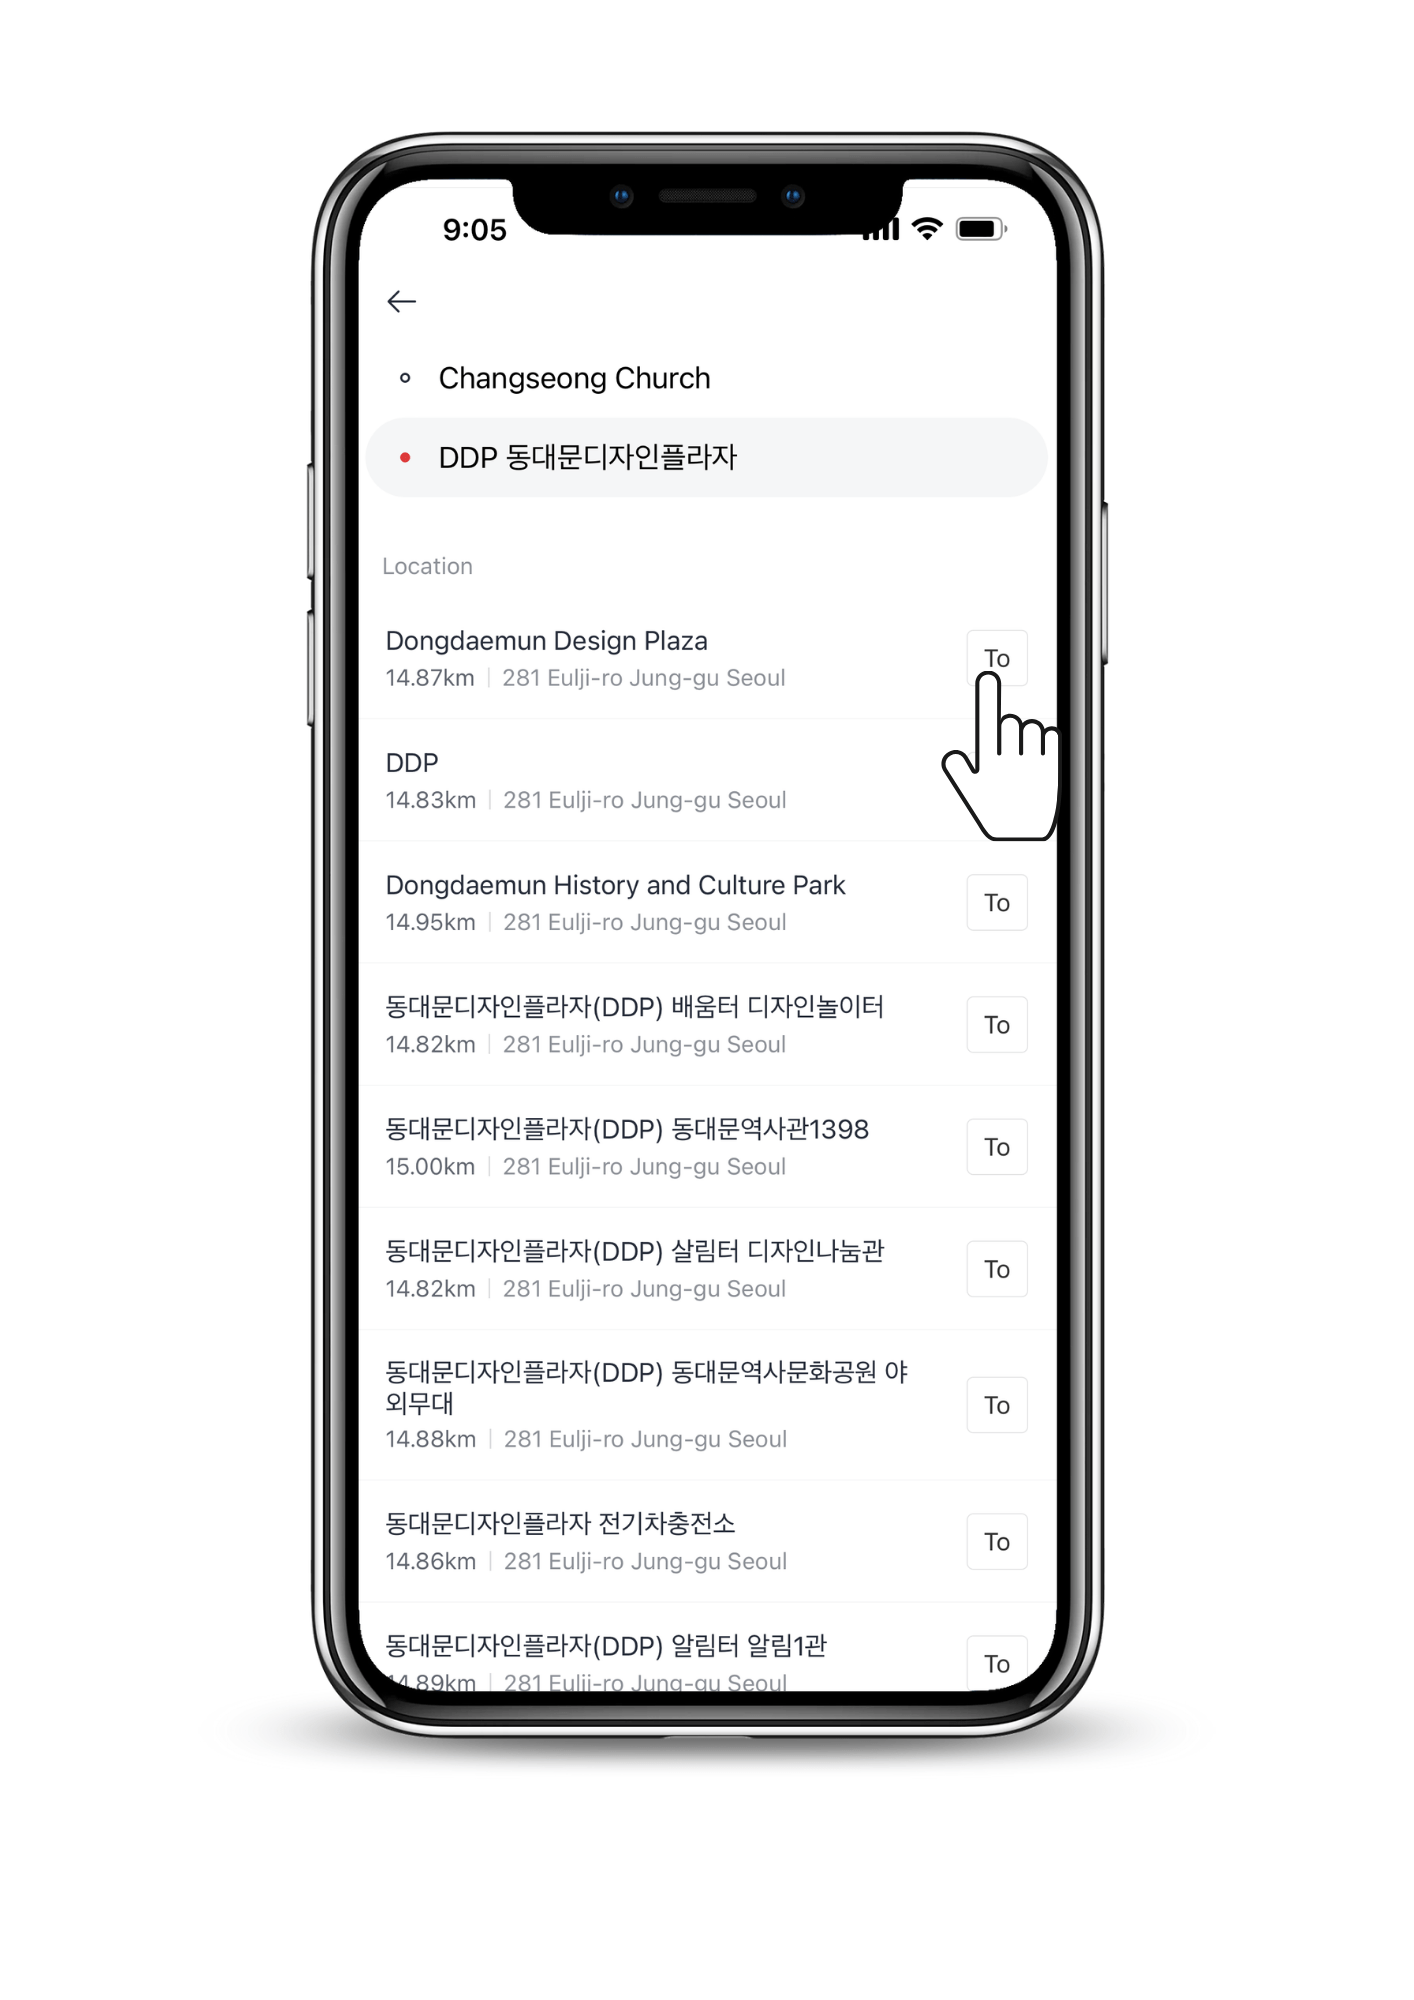
Step 3: Pick Your Destination
Select your journey’s end location in the same manner you chose your starting point. You can either input the name or address of your destination or pinpoint it on the map.
Step 4: Select Your Taxi Type
Next, you’ll need to decide on the type of taxi you prefer for your trip. The standard taxi option is labeled as ‘General Request,’ and this corresponds to the typical street-hailed taxis. Alternatively, you can opt for larger taxis or premium taxis. These options offer more spacious or luxurious rides compared to standard taxis but do come at a higher cost.
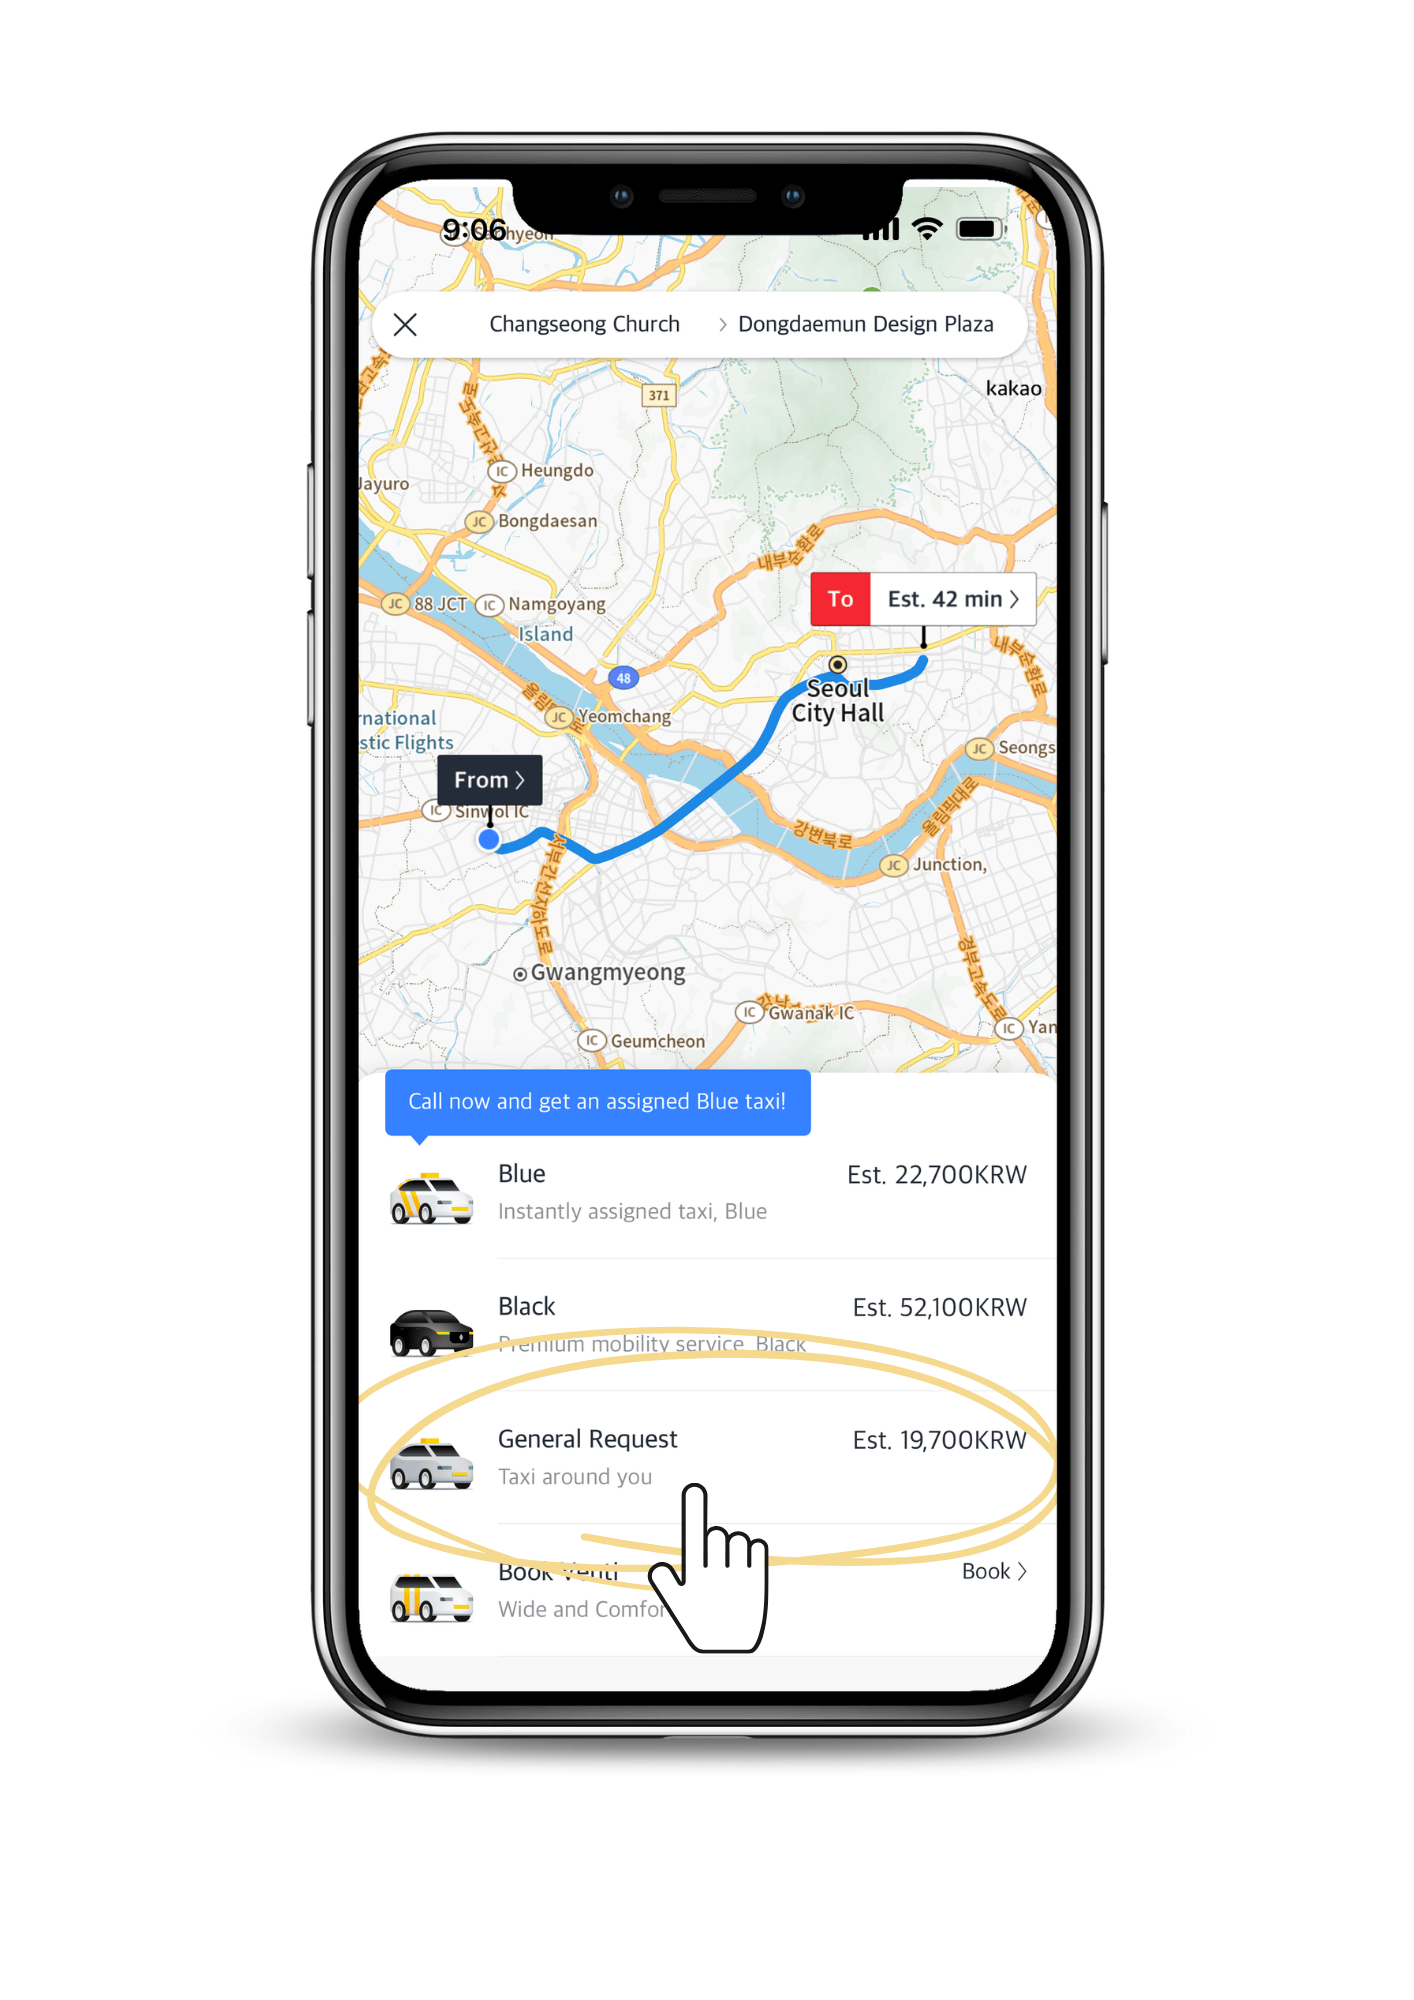
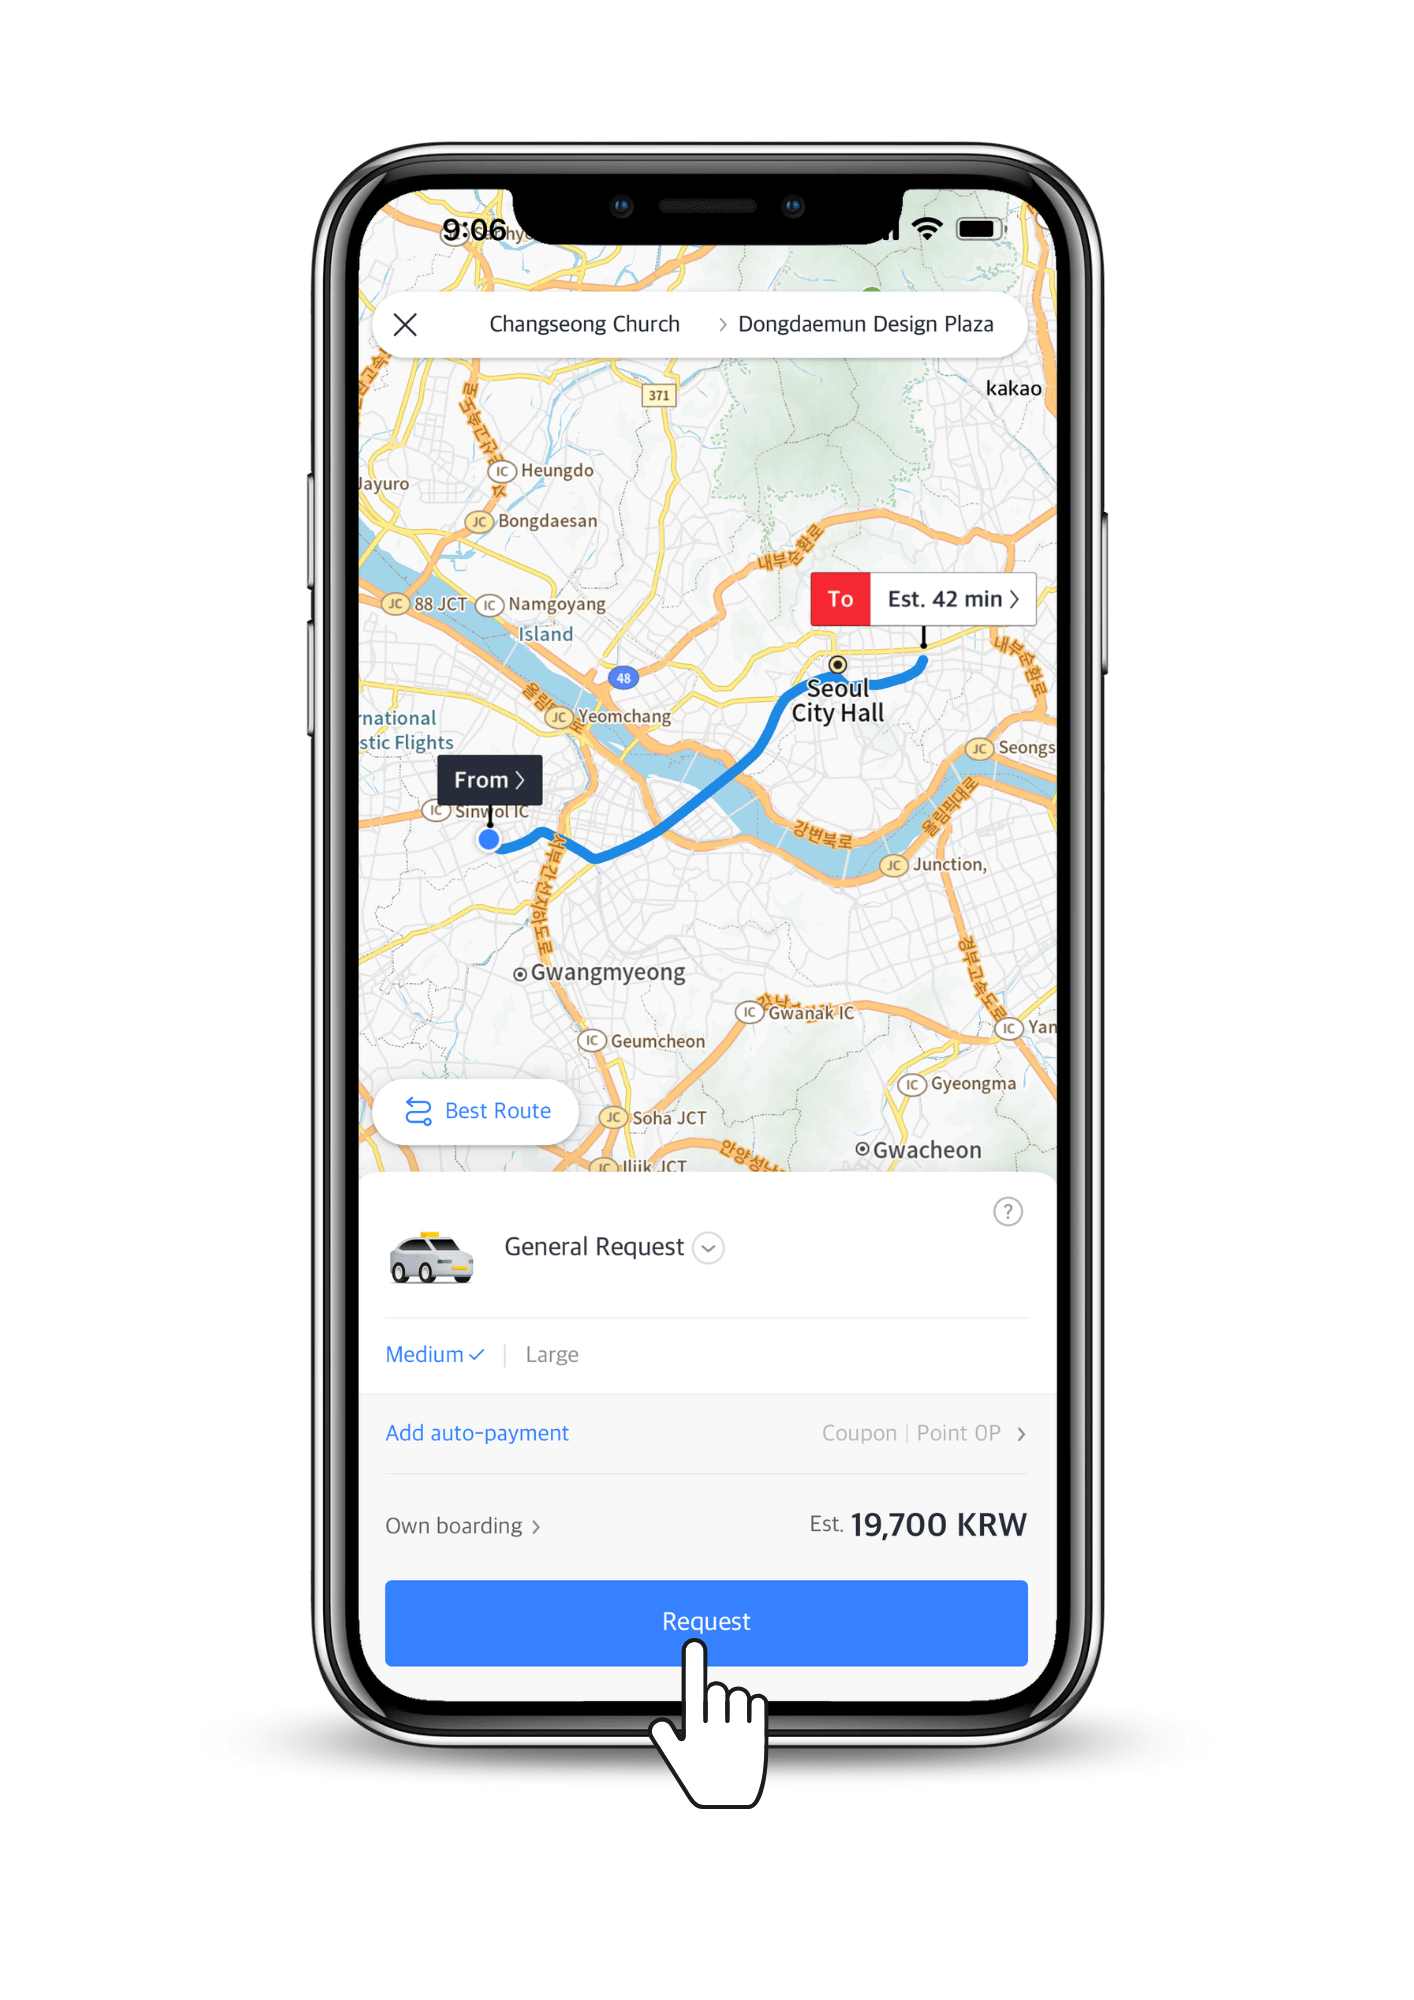
When you’ve chosen your taxi type, the app will prompt you to confirm your request. If you’re sure about your selection, simply tap ‘Request’ to proceed.
Step 5: Choose Your Payment Method
After selecting your preferred taxi type, the next screen will prompt you to choose your payment method. This step can sometimes be tricky because the default option is to register a card, which requires a Korean phone number.
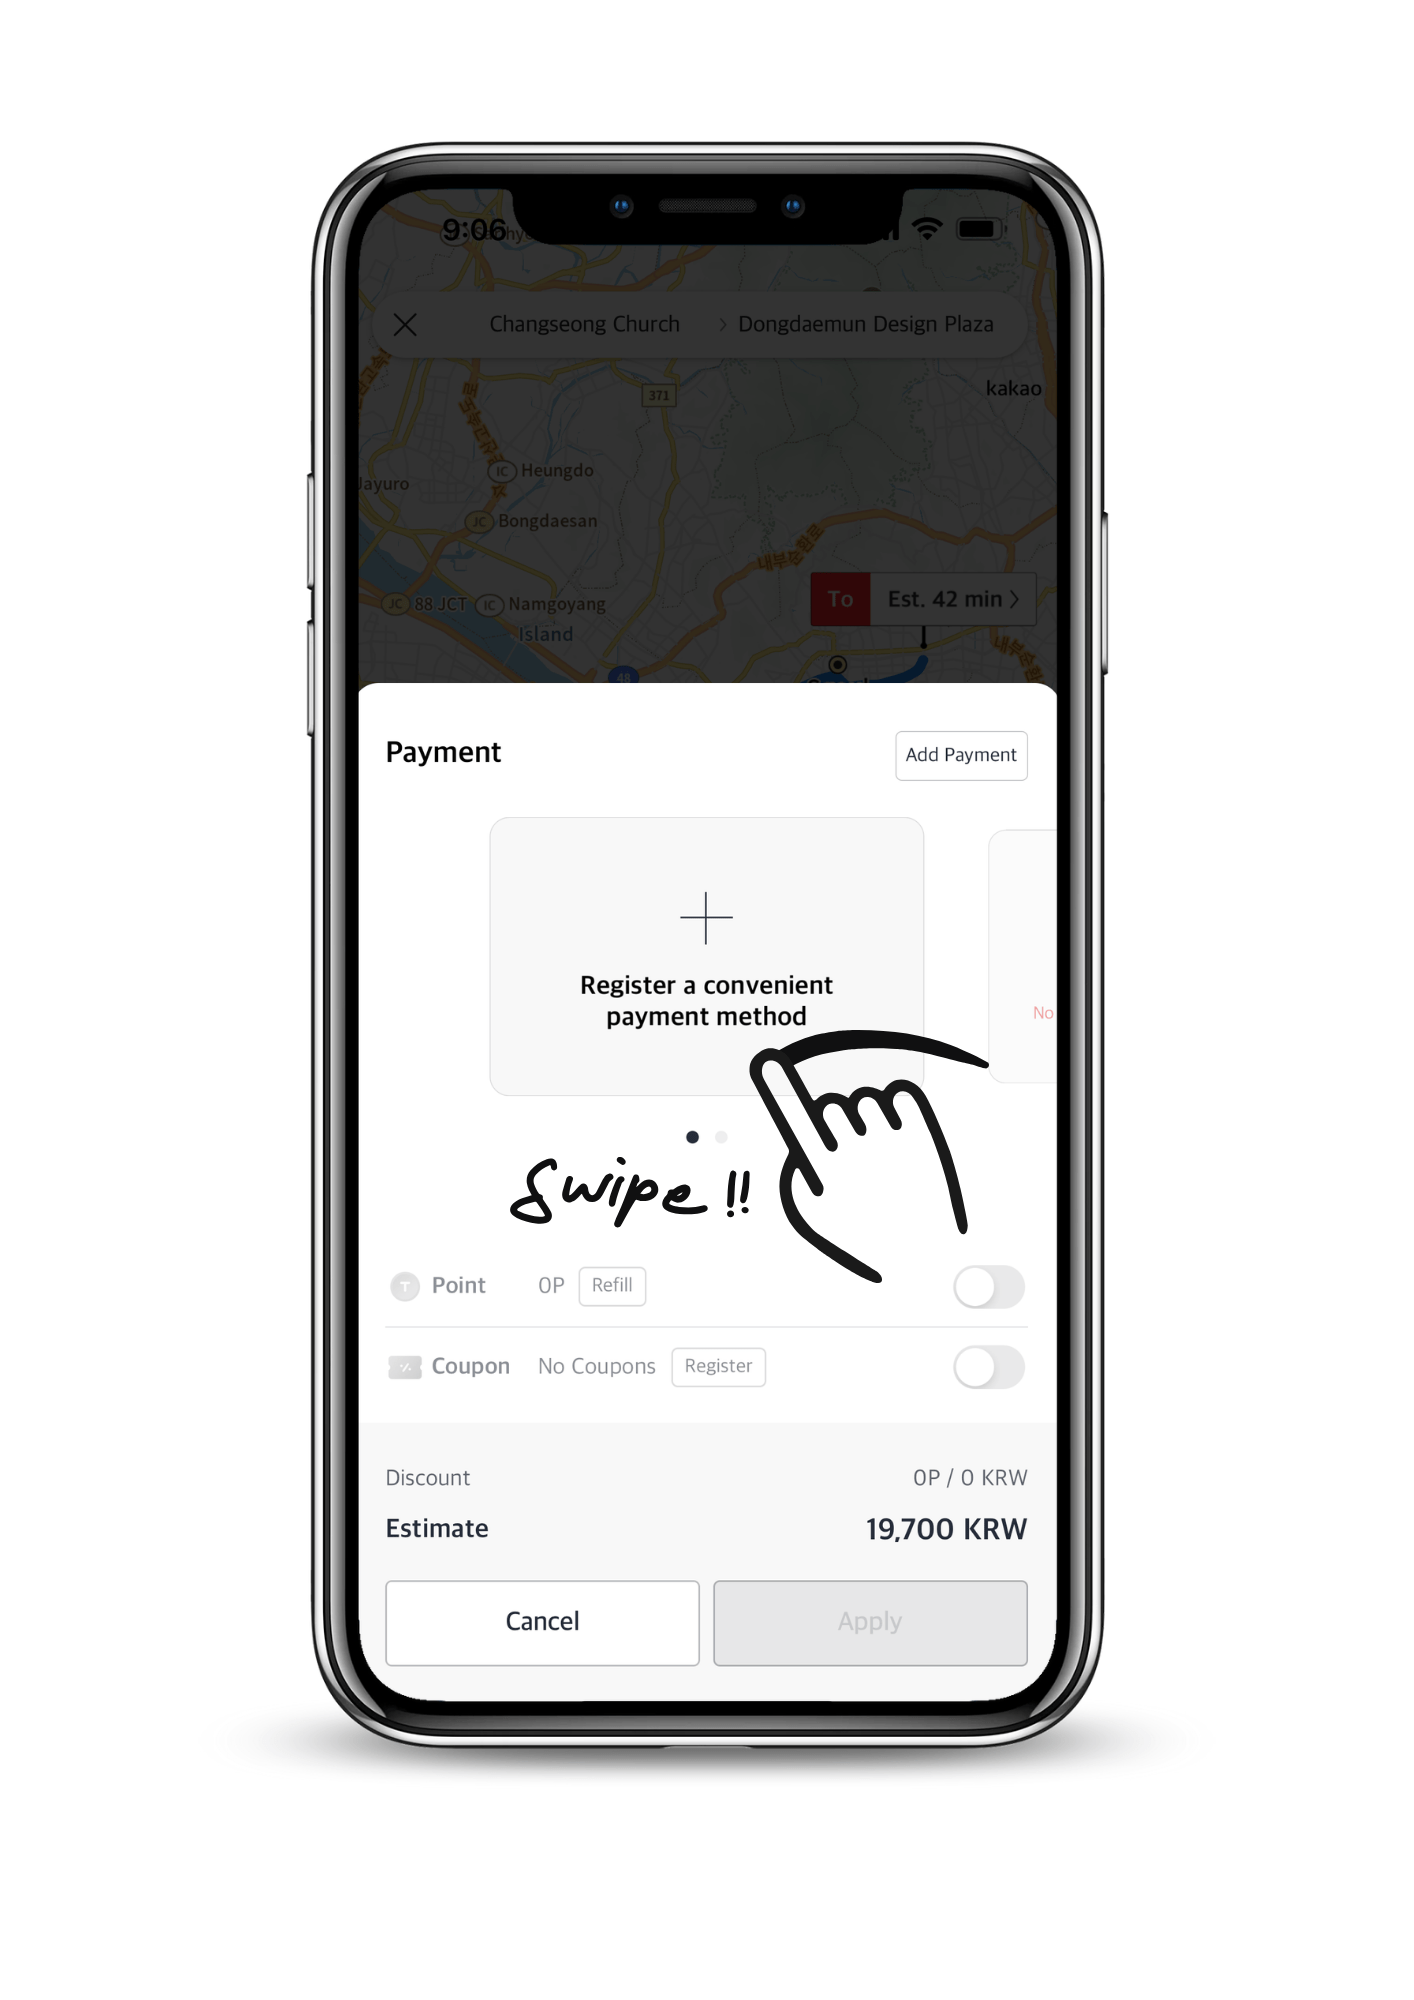
To use Kakao Taxi without a Korean phone number, simply swipe left on the payment screen to access the second option, which reads ‘Pay to the driver.’
Step 6: Confirm Your Taxi Booking
Once you’ve selected your payment method, click ‘Apply,’ and you’ll return to the previous taxi request screen. Here, tap ‘Request’ to summon your taxi.

Your taxi will soon make its way to your location, with a conspicuous green sign displaying the word ‘예약’ in the window, indicating that it’s reserved. The taxi driver might give you a call or send a message to let you know when they’re close by.
Step 7: Enjoy Your Taxi Ride
Once your taxi arrives at your location, hop in, and the driver will take you to your destination.
Step 8: Settle the Fare
Upon reaching your destination, pay the taxi fare according to the payment method you selected earlier. Then, exit the taxi. If you opted to register a card with Kakao Taxi, your payment will be processed automatically. If you chose ‘Pay to driver,’ you’ll need to settle the fare using cash, a credit card, or T-Money.
Additional Tips for Using Kakao Taxi in Korea:
No Need to Tip: In South Korea, tipping is not a customary practice, and this includes taxi rides. When using Kakao Taxi, simply pay the fare as indicated on the app, and you’re good to go.
Limited Availability in Rural Areas: While Kakao Taxi covers the entirety of mainland South Korea, including Jeju Island, do be aware that hailing a taxi through the app might pose a challenge in more remote rural areas, both on the mainland and on Jeju Island.
Understanding Taxi Lights: Korean taxis employ a color-coded light system to signal their availability status. These lights are displayed on a signboard typically located next to the rearview mirror and become visible as a taxi approaches. A red light accompanied by the word ‘빈차’ signifies that the taxi is vacant and available for hire. Conversely, a green light bearing the label ‘예약’ means that the taxi has been reserved. If you’ve booked a taxi through Kakao Taxi, keep an eye out for the green lights to identify your reserved ride.
Now, armed with these valuable tips and essential know-how, you should be well-prepared to navigate the world of Kakao Taxi. By following the steps detailed in this guide and respecting local tidbits, you’re all set for a seamless and unforgettable adventure through the captivating landscapes of Korea. Safe travels and enjoy your time in Korea to the fullest!
Other Korea Post You Might Like:
Did this entry help you? Or Did you enjoy my photos? Help support my small blog by giving a little cup of joe. I am always grateful when readers reach out wanting to support 🙂
p.s. This post is independently created. However, when you book or purchase something through the retail links, I may earn an affiliate commission to help keep Ploy’s Little Atlas running. Thank you very much for your support!
p.p.s All images used (unless specified) are owned by the author of the blog and permission is required for a repost. Please, reach out via social media channels to ask beforehand if you’d like to use them.